
Tuesday July 13, 2021
The Ultimate Rosin Pressing Guide
It’s no secret anymore, solventless products and live rosin have taken over the top shelf at dispensaries and many consumers choose them for a multitude of reasons. From quality to flavor, rosin offers an upscale, luxury cannabis experience based entirely around the nuanced characteristics of cannabis that many have come to know and love. Now refined almost to the point of fine wines, cannabis connoisseurs are craving the latest and greatest solventless products.
The beauty of rosin lies in its simplicity. Ice, water, are all that go into hash making and pressure and heat are all that is needed to make rosin. However, the very things that make rosin desirable also make it welcoming for both new and experienced concentrate makers. Large or small scale, the basic principles of trichome harvesting and applying heat and pressure are the same. With just a little know-how and some guidance, almost anyone can produce rosin.
However, making high-quality rosin and hash preparations requires much more knowledge and detail.
Obtaining a quality gram of rosin may be easier than ever to purchase at your local dispensary, but extracting and processing your own rosin is an extremely rewarding endeavor that every cannabis enthusiast should consider trying. From cultivation all the way to post-press finishing techniques, commercial hash makers and home rosin pressers alike have been refining their craft to produce new and exciting products to dab.
Top-shelf hash makers are artisans that bring years of experience to the table, and making the finest hash will require added steps and processes to ensure that every detail is the best that it can be.
Join PotGuide as we team up once again with the solventless pioneers and experts at PurePressure to bring you a comprehensive, step-by-step guide to the ins and outs of rosin pressing. From commercial strategies to methods you can use in the comfort of your own home, we’ll take you through each step of the process. Additionally, learn more about the plethora of pre-press parameters (flower vs. hash rosin, how to pack a filter bag with starting material, fresh frozen cannabis/hash vs. non, etc.) that are required to create quality rosin products.
Why Learn to Make High-Quality Solventless Concentrates?
Learning hydrocarbon-based extraction comes at a high price of entry. Being successful requires safe, regulated operation of industrial equipment and knowledge of complex chemical processes. Not to mention that errors in solvent-based processes can be both costly and dangerous due to the chemicals involved. For home extractors these dangers are much higher, as evidenced by the illegality of personal producers extracting concentrates using chemical solvents. We cannot stress enough the dangers of home extraction or “open blasting” using hydrocarbon solvents.
Solventless extraction, on the other hand, makes it much easier for one to gain the experience needed to make truly good rosin and hash. A lack of chemicals removes safety issues in both preparing and consuming hydrocarbon extracts, the equipment is simpler with fewer moving parts and variables to account for, and lastly, as mentioned, nothing is likely to explode, as has happened with butane and other solvents.
Anyone can get into making hash and rosin. Acquiring the knowledge needed to improve your rosin making skills is simply more attainable, and you’ll walk away with better concentrate in the end. While it may require more steps and greater attention, these elements are certainly approachable, and even small tweaks can translate to a leap in quality. This is true for both hash making at home, and on a larger commercial scale, so no matter how you apply this knowledge, it can easily adapt to meet your needs.
Solventless Hash Extraction Overview
Before we dive right into the ins and outs of rosin extraction, there are a few factors to consider. It’s also important to think about the big picture as you go about your planning. Remember, you can’t make rosin without high-quality starting material!
Determining Goals
Another aspect to consider is what your overall goals are and how to reasonably attain them. Knowing what you want to get out of your rosin making will go a long way in helping you determine how much time, energy and resources you want to put into it. Each element of the hash making process can impact the final product, and determining your goals can help you decide where to allocate resources. A novice hash maker might have the goal of simply producing anything smokable successfully and thus focus on the basics of each step, whereas a more seasoned hand might be working on reducing residual plant matter, therefore focusing on the washing and filtering steps. Conversely, a commercial operation could be looking to develop consistent yields and increase revenue through additional solventless SKUs. Try and think of what benchmarks you’ll use to determine success.
Gathering Equipment
Once you know what you’re looking to achieve, start by taking stock of what you have. A grower with access to fresh bud won't have to worry about starting material, but may not have a quality rosin press. Or say you’ve purchased a nice press, but lack a way to wash your cannabis. Once again, this comes down to effective resource management, and will help you know any missing elements, or areas that could be improved.
For making the best rosin, it is ideal to acquire equipment that is purpose-made for rosin making. While consumable rosin can certainly be made with a hair iron and parchment paper, it’s worlds away from the supreme top-quality rosin we know and love. If you compare it to something like coffee: would you prefer a cup of joe made over a campfire with an improvised filter and coffee grounds swimming in it? Or would you like a fine espresso? Both are processed coffee, using generally similar techniques, but they are not the same. Proper equipment can have a significant impact on end-product quality.
We’ve partnered with PurePressure to bring you solventless education for this very reason. PurePressure rosin presses are revered among hash extractors in both the commercial and at-home verticals. If you’ve bought rosin from a dispensary, odds are you’re consuming products made with a PurePressure press.
Coming from the dispensary world, PurePressure’s founders saw that a large part of the market was still struggling with inferior machinery that was re-purposed to make rosin, instead of specialized rosin-making equipment. In creating products that aimed to streamline the hash and rosin making process, they’ve helped to elevate the product as a whole. As a result the majority of top hash and rosin producers have turned to PurePressure’s designs, and that same logic easily transfers to your personal efforts. It may seem redundant to state, but making rosin is a whole lot easier and better when made on machinery made for making rosin. This applies to both commercial and personal producers, and PurePressure offers many options for either or both.
Hash making has deep DIY roots, and everyone in the scene should have an appreciation for the pioneers that helped to develop those homemade techniques. At the end of the day, you’ll be working with what you have access to. Some elements of your setup may be less professional than others, and that’s just fine. However, we’ve come a long way from the wild west days, and if you can swing it, it’s a good idea to upgrade from the campfires of old if you’re looking to make the best rosin available.
Materials and Setup
What You’ll Need for Making Top-Quality Hash and Rosin
There are a few things you’ll need to make quality hash rosin. Take a look at the list below for a detailed breakdown:
Plant matter
In order to make cannabis products, you will of course need some cannabis to work with. The variables that will determine the final quality of your rosin start right here, at the beginning. As such, it’s important to be aware that the rosin making process will help to preserve and elevate the best qualities of your cannabis, but it can do very little to change them. Some post-press processing such as jar tech can help to further lift terpene levels, but in general, what you put in is very close to what you get out. This is less true for hydrocarbon extraction, where the chemical processes can separate out the terpenes and cannabinoids, by basically chemically burning off the rest. Pretty cool science, but not quite the level of refinement that rosin can offer.
Weak terpene and cannabinoid profiles will be evident in your rosin just as much as they are in your flower. You’re about to invest some considerable time and effort into turning that bud into high-quality rosin; make it count. If you go through all of that just to use mediocre flower, you’ll be starting from behind. Highly resinous flower is the best for pressing and many growers nowadays focus solely on “resin farming” to create strains that yield high percentages when processed. Additionally, using “fresh frozen” flower is highly recommended for increased flavor and preservation of mono- and sesquiterpenes.
Freezing Setup & Materials
We’ll be primarily focusing on ice water hash in this guide (though we’ll also cover dry sift hash as well below). Thus, you’ll of course need some ice for all of this, bags to store the fresh frozen flower in, and a freezer to store it once collected. Vacuum sealing your frozen flower is ideal to limit air exposure while it’s being stored before processing, so consider purchasing a vacuum sealing kit as well. Even if you’re making dry sift hash, you’ll want a way to freeze your buds before putting them into a trichome separator or sifter box, so having good refrigeration options is still a must.
Washer/Liner/Screens
You’ll need a vessel to wash your buds in to harvest your trichomes, and a liner to filter out trichomes while keeping all of the ice and flower in place. This larger liner will have a bigger micron size than the filter bags you’ll use later, but using one in this step will help out the efficiency of your wash. If you’re dry sifting, this step utilizes filter screens instead, but the concept of the step is the same.
For ice water washing, the container can be as simple as a large plastic bucket (a clean, unused Brute garbage bin has been a classic option for many years), or as advanced as a professional hash washing vessel (thus the “Bruteless” line from PurePressure). A professional washing vessel has some obvious significant advantages over a regular plastic bin, and we’ll cover those in more detail below. In general, a purpose-made hash washer will net you higher yield for less effort, and result in an overall cleaner, more refined product.
Paddle/Agitator
This will be used to agitate and mix the flower within your ice washing vessel, which will cause the trichomes to fall off and into the ice bath. You’ll want a sturdy paddle made with professional material; ideally a hardened, food-grade plastic that won’t chip or break. Make sure that it’s a good size so that you’re comfortable, and that it's big enough to move the amount of starting material you’ll be working with. Agitation can be done mechanically with a motor and other specialized equipment, but a large amount of hash washing is done by hand.
For advanced commercial operations, PurePressure’s Axis trichome separator offers scalability and enhanced control capabilities that are unrivaled by other washing methods. If one of the goals you outlined above was in relation to increasing efficiency and throughput, then definitely consider purchasing an Axis unit.
Sifting Bags/Bubble Bags

Hash washing bags, also known commonly as bubble bags, are the layered filter bags that your wash water will be poured through to separate and catch the trichomes. You’ll place them atop a bucket over one another so that as the trichomes move through them, they will get progressively smaller in size, removing more and more plant matter. The process of washing and sifting can happen multiple times to extract every trichome, however, only a small portion of every yield will be top-tier full melt (5 or 6 star hash). To make the best bubble hash, and subsequently the best rosin, you’ll want to have a variety of hash washing bags and micron sizes. Top commercial operators typically use anywhere from five to 8 bags per wash, with the average micron sizes being 220μm, 190μm, 160μm, 120μm, 90μm, 73μm, 45μm, and 25μm.
Freeze Dryer
A dedicated freeze dryer like those from Harvest Right will help to purge out excess moisture from your ice water hash and prepare it for pressing or consumption. Using a freeze dryer (as opposed to open-air drying) will help to keep microbes and other contaminants from forming. There are some simple methods to do this without a professional freeze dryer (you can use your regular freezer at home), but they will lack the consistency and control that you’re looking for as an artisan hash maker. If you’re regularly making ice water hash, it’s a worthy investment.
Rosin Pressing Bags
If you’re going to be pressing your hash into rosin, you’ll need pressing bags. These are filter bags that get used in a rosin press to filter out the very last remaining bits of plant matter from the hash, and are very different from the bubble bags used for sifting and ice water agitation. Instead, they are small, rectangular bags that will be filled with bubble hash, dry sift, or cured flower to be pressed into rosin.
Parchment Paper
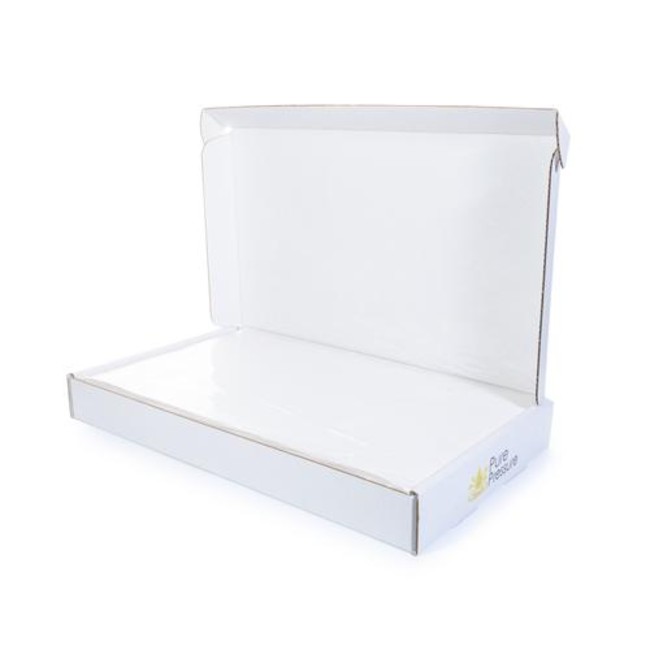
Parchment paper is used for its heat-resistant and non-stick qualities. This is what you’ll collect your washed trichomes onto for freeze-drying, and what you’ll press onto when using a rosin press. It works well to store your rosin on until you can get it into a glass container for sale or personal storage, as well. If you’re looking to stock up, they’re also available for PurePressure, and will fit perfectly in their machines.
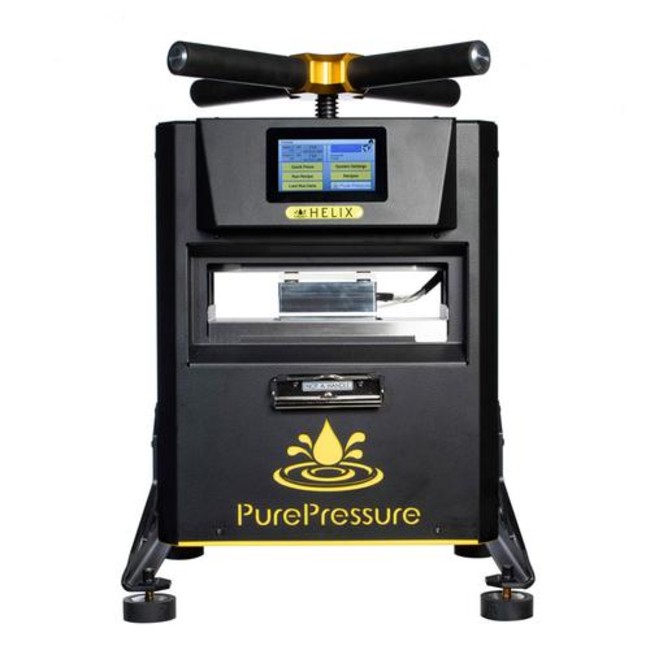
Rosin Press
The pièce de résistance in your rosin-making setup. While it’s function may be straightforward (plates warm up, press goes down), your rosin press is likely the most important piece of equipment in your setup, with the washer or trichome separator coming in at a close second. There are a number of excellent options from PurePressure, from simple to advanced, but regardless of which specific machine you buy, all will offer precise temperature and pressure control. There are many other important features, such as the ability to save and recall settings of previous pressings, but in general, precise control, professional construction and good plates are the key elements here.
Assessing Your Setup
Now that you know what you’ll need, in order to elevate your overall hash making setup, take a look at what you have.
First, you’ll want to gather and take inventory of your supplies. Be sure that you actually do have those extra filter bags stashed away, or that your fresh frozen flower is still looking good. The key here is to not assume. There’s nothing worse than getting deep into the process only to realize you’re missing a necessary element.
Next, make a list of anything you’re missing or that can be improved. Have you stocked up on parchment paper? Are you all out of filter bags? How did your washer perform last time? Was it to your liking? Analyzing weak points will help you get an idea of where to put the most attention.
Finally, determine the most important aspects to work on. You may want a fancy new washer, but if the one you’ve been working on is performing well, it might be better to invest in a better press, or filtering equipment. Even for commercial operations, upgrading everything at once can be daunting, and you’ll get a lot more impact out of shoring up the most vital loose ends first. Your rosin press and hash washing components will be the two largest and most impactful elements, but require a larger investment. Bags, pressing weights, filters, and other accessories may be easier to obtain, but can’t address some larger issues. Aside from having excellent starting material, the key to upping your overall quality is analyzing and understanding your process.
Choosing the Right Flower for Solventless Hash
As we touched on above, one of the chemical miracles of hydrocarbon extraction is the ability to make good concentrate from mediocre, or even bad, starting material. A talented solvent extractor can turn snicklefritz into gold by chemically stripping out the key elements, and purging the rest. It is fascinating, results in pretty decent extract, and is not at all how rosin making works.

Without the crutch of a chemical aid, rosin makers must be choosy about selecting their starting bud, and will have to carefully guide it through the harvesting and pressing process to wind up with the best rosin.
Think of this similar to making pottery. Using a mold, a creator can punch out identical bowls regardless of what the initial lump of clay is like. This will result in attractive, effective, identical products with little error. Now compare that to an artist using a pottery wheel. The clay must be carefully built upon and shaped; impurities or errors along the way will affect the whole of the work. However, the resulting product is rare and unique, and a more accurate reflection of the artist’s skill and labor. Rosin makers are more like the artist at the wheel, carefully working the clay as they go. Mistakes early on will echo out into the final piece.
This is why hash makers stick to the age old wisdom of quality in, quality out. Meaning if you want to achieve a high-level end product, you’ll need to start with high-quality base materials. We cover this in some more detail in our Live Rosin & High-Quality Solventless Cannabis Products Guide. But how do you go about choosing the best flower?
Selecting Your Strain
Not all strains will yield the same amount of hash or rosin. Regardless of whether you are pressing flower or hash, highly resinous strains are ideal, meaning ones with a lot of rich trichome coverage. Check out the graphic below for some strains PurePressure recommends for good yields*.
Recommended Strains:
- Chem Dawg, Chem Strains
- Gorilla Glue, Glue Strains
- Cookies & Cake Crosses
- The White, White Crosses
- Gelato, Sherbet Crosses
- Cookies & Cream Strains
- GMO (Garlic Cookies) (Chem Cookies). GMO Crosses
- MAC (Miracle Alien Cookies), MAC Crosses
- Papaya Strains
- Tropicana Cookies
- Sour Kosher, Many Sour Strains
- Pie Strains
- Sugar Coat
*While these lineages are very popular in solventless hash overall, each phenotype will behave differently. Their growing conditions may have a large impact as well.
Fresh Frozen is Ideal for Hash and Rosin
One of the key elements that sets top-shelf rosin and hash apart from more standard offerings is the freshness of the starting material. As soon as the flower is cut from the stalk, the degradation of your flowers’ cannabinoids, terpenes and other beneficial compounds begins. In order to slow that process and preserve these vital compounds, hash makers will freeze their stock as soon as it is cut to keep it fresh until it is processed.
Rosin can of course be made from cured bud, however, it will come at the cost of cannabinoids, and especially terpenes – in addition to the major terpene notes of any cannabis plant are softer, more subtle secondary terpenes, or terpenes that appear in only trace amounts. It is these more robust profiles that rosin hopes to capture, and thus rosin from cured bud is almost always guaranteed to be of lower quality than that made from fresh, frozen starter. You can also make rosin from dry-sifted hash (more on that below), however it is difficult to achieve the same level of purity and freshness. For consistent high quality, fresh frozen cannabis flower works the best.
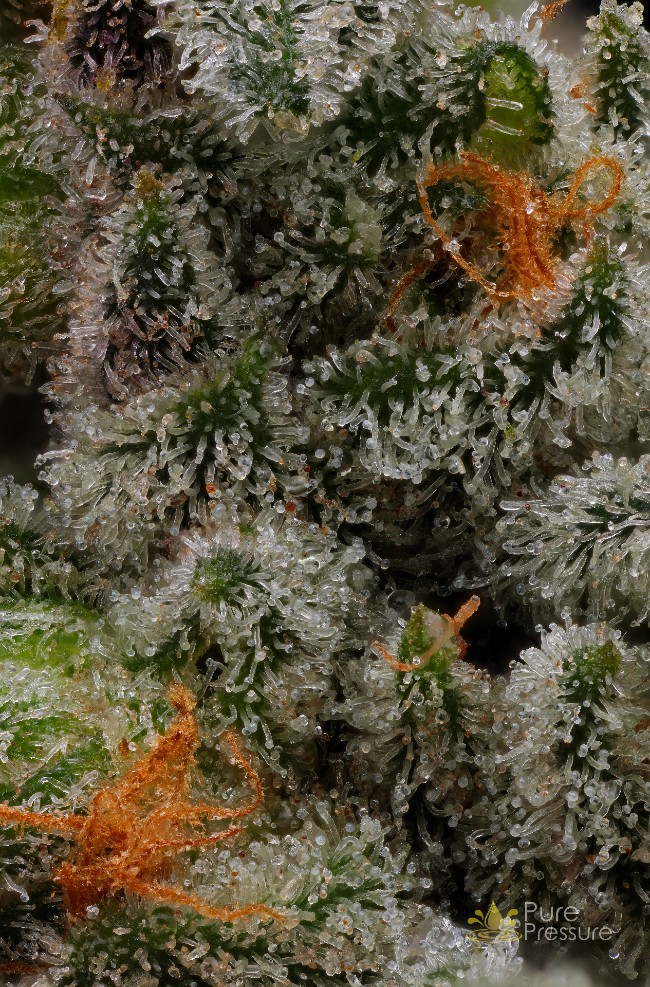
Trichome Quality
What do the trichomes look like on the flower? Are they clear or murky? What does the structure look like? Mature trichomes will be either clear or slightly clouded, but any further into that process and they will start to degrade and take on color. It should be noted that some flower has naturally darker elements to its trichomes, but you’ll still be wanting something generally on the lighter side. The physical structure of the most common trichomes is a defined stalk with a well formed bulb at the end, sort of like a lamp post. Healthy plants will have well-defined trichomes, as opposed to weak or abnormally shaped trichomes.

In studying the trichomes, you can also see if there are any other residual substances on the flower that aren’t trichomes, such as post-harvest amplifiers or substitutes that were sprayed on the cannabis (which should be heavily avoided). You can get a decent look at color and clarity with your eyes, but to really inspect, it’s ideal to have a jeweler’s loupe or magnifying glass to get a better look at trichome quality.
Terpenes
As many a budtender will tell you, “the nose knows.” Your body tends to respond to things it likes, and can communicate that pretty clearly if you pay it a little attention. Especially if you’re producing for yourself, let your scent intuition guide you. This may not always mean overly sweet or gassy-smelling strains; many can be subtle and complex, with exotic and even outright strange bouquets. Seek out flower with rich, attractive terpene profiles, as this will be a large element in your final product. You’ll be looking for clear scent notes, with little to no wet grass or hay smells (generally denoting under ripe on the former, and overripe on the latter).
Just like with wine tasting, closing your eyes and really focusing on what you are smelling can help. Try and put some words to the notes you’re detecting (there is no wrong answer here, you’re just looking to help yourself identify and categorize, not pass a test on what’s present). Give a listen to any sommelier and you’ll hear an entire lexicon of strange descriptions, from “old leather and tobacco,” to “barnyard,” attached to some of the most expensive wines in the world. What you’re looking for isn’t about choosing the “best” scents, it’s about choosing what’s interesting or attractive to you.
Bud Health & Structure
Here you’ll examine the structural and physical properties of the flower. Is it well colored? Is the structure overly loose or dense? Are the stems too thick or thin? It is important to learn to identify a healthy, well grown bud when deciding what will go into your press.
Coloring will vary from plant to plant, but you’ll want consistent, clearly developed tones, avoiding anything brown or overly yellow (again, this will have some genetic variation, but should give you a good general metric).

Bud structure refers to the compactness of the flowers and calyx structures as they bundle into a nug. Loose structure, with parts pulling away from the center or errant flyaways is referred to as “larfy” and should be avoided, likely denoting poor plant nutrition and low resin content. On the other end of the spectrum, dense or tightly packed buds can denote overuse of plant growth regulators or other artificial enhancements to the plant. The ideal firmness and structure will also vary a bit from plant to plant, but generally speaking, you’re looking for a nice “slightly-firm sponge” consistency. If you’re familiar with the hand technique for checking steak temperature, you’re looking for something similar to well-done consistency. Touch your thumb to your pinky on one hand. Now squeeze the fleshy part of your palm between your fingers with your opposite hand. That level of firmness, or just slightly above it, is close to ideal.
Finally, stems should be firm, but not overly thick or rigid. Alternatively, thin or wispy stems may be indicative of a number of deficiencies, from nutrient deficiencies to poor air circulation.
Desired Effects
If possible, try and work out some of the desired effects of the cannabis you’re looking to use. This can involve smoking a batch of the same strain you're interested in exploring, or returning to reliable effects you’ve encountered in the past. If you have a workable familiarity with a wide range of strains, try and think about what preferred effects accompanied certain terpenes or strains. Anecdotally, rosin consumers report that the effects of solventless concentrates are more pronounced than those of other concentrate preparations, so you’ll want to select your starter with that in mind. An already energetic strain might be even more amplified in rosin form, for example.
Harvesting Trichomes and Making Hash
Fresh Frozen Flower: Ins and Outs
We are going to talk a lot about fresh frozen flower in this guide and for good reason, it tends to better capture the true profile of flower when turned into rosin. In order to understand why, you’ll need to know a little about the curing process.
All plants are full of water, to some degree. Plants survive on water, and just like in humans, it composes the majority of their bodies. When they are cut (and thus die) that water remains trapped within. Contained within the cut plant, microbes and other small life will find it and feed on it, which is how things like mold and mildew grow. Alternately, in the open air, the water can evaporate quickly and take vital components (like terpenes) along with it, leaving the plant matter brittle and desiccated. Curing is a slow, controlled releasing of the water and other “wet” elements of bud that is not so fast as to leave it desiccated, and not slow enough to allow unwanted pests to grow. By carefully timing this process, the bud will become shelf-stable and preserve a large part of the cannabinoids.
However, all cannabinoids and terpenes will deteriorate with exposure to light and air (known as oxidation), and thus, the time spent sitting on the bud while curing will naturally deplete some of the terpenes and cannabinoids, regardless of the fact that a significant portion is preserved.
Freezing the flower upon harvest halts this process, both forcing out some of the moisture, and locking out air. That is why fresh frozen cannabis is an ideal starter material. However, you can only make live rosin if you have access to fresh cannabis, and many don’t.
The simple fact is that many commercial processors and at-home pressers use cured flower or dry-sift hash. It’s what they have available, and they might have some darn good stock at that. Having only cured bud doesn’t mean you can’t make good rosin, just that some steps will be removed from the process. If fresh frozen is not something attainable currently, then move on. There is excellent rosin to be made with dry sift. Maybe you can make fresh frozen a part of your improvements on the next go, but it certainly shouldn't put a stop to your hash making endeavors. If you’re using this guide for cured bud or dry sifted hash, simply move on to the sifting and pressing processes below.
When to Harvest Your Flower
If you are growing your own cannabis for hash making, be sure to carefully monitor your plants for their ideal harvesting time. Once a plant flowers, and fully develops those flowers, the plant will begin to die, and the terpenes and cannabinoids will degrade along with it. As there are dozens of ways to grow, it’s difficult to put a hard number in terms of days or weeks for when you should harvest, but 8-10 weeks after flowering is a good general guideline. However, your plant will give you some information about its ripeness with a few key signs.

Trichome health is one of the best ways to determine when your buds are ready for harvest. What you’re looking for is slightly milky white trichomes, possibly just broaching into amber, but not quite. Clear trichomes tend to indicate that the plants need more time, and overly amber trichomes mean they may have started to degrade.
The coloration of pistils can also be helpful. You’ll want a majority of your pistils to have turned to brown (or rather more of an amber, reddish-brown, but we’re speaking generally here), but not all of them. Alternatively, if you have a majority of white pistils, the plant probably needs a little more time. Look for about 70-80% colored pistil coverage.
Harvesting, Preserving and Preparing Your Flower
Okay, so you’ve got some fresh cannabis that you want to turn into ice water hash, now what? High-end modern hash makers have found that the best method to preserve cannabis flower for making hash is to start by freezing it. Why would you do such a thing? The reason is preservation.
As we’ve discussed, when a plant is cut, its metabolic processes stop, and it begins to break down. Cut off from their source, the cannabinoids and terpenes contained within the plant’s trichomes will begin to degrade over time, and that process will be expedited with exposure to light and air. Furthermore, the tiny microbes that live on the plant will begin to use the plant as food and propagate.
Freezing halts the metabolic breakdown and preserves the plant’s vital compounds. However, this method of preservation is specific to making concentrates. Only ice water hash (which can ultimately be made into live rosin), and live resin can make use of fresh frozen flower as a starter material. To be smokeable, the buds would of course need to be dried and cured, and frozen bud cannot be pressed directly into rosin because the water content would ruin the pressing (this could be in the form of excess chlorophyll getting into the rosin, or potentially bursting the filter bag, among other issues). Overall, fresh-freezing and live harvesting is the best way to preserve cannabis, but it can only be used for certain preparations.
Materials Needed for Harvesting Fresh Frozen Cannabis
Here’s what you’ll need to create fresh frozen flower:
Plastic Bags
When harvesting, you’ll of course need something to store your bud. Opt for plastic bags, as they won’t degrade when exposed to water (this may seem an obvious point, but we want to make it clear that cloth or paper bags shouldn’t be used, you don’t want small fibers winding up in the hash). For ideal preservation and storage, you’ll want to vacuum seal the cannabis before freezing, so why not harvest right into the vacuum bag?
However, you don’t want to vacuum seal right away. It is most ideal to leave the bags open in a freezer for a few hours until the harvest is frozen through. This lets some water evaporate off before you seal it, helping to prevent freezer burn and extra ice crystals forming on the buds.
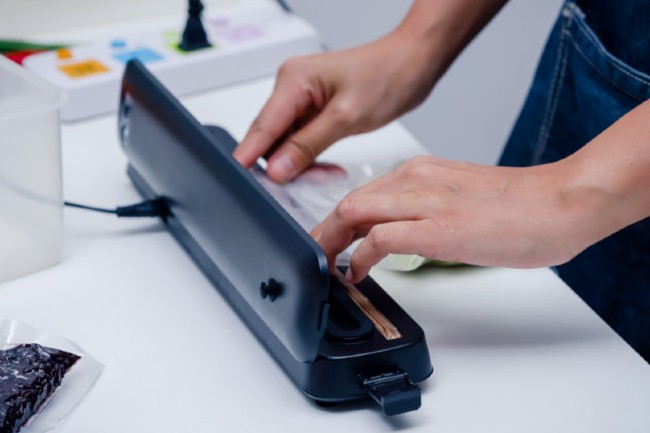
If you don’t have a vacuum sealer at your disposal a zip-lock style bag will do, just try to get out as much of the air as possible.
Ice
The ice that goes into making ice water hash will ideally be made from reverse osmosis (RO) water. Reverse osmosis is a process used to ensure the purity of the water, and this is of critical importance for the ice that directly touches the bud, and later the separated trichomes.
However, ice used for storage and freezing won’t have direct contact with the flower, and as such can be any ice you have available, which you can source from a standard ice machine or purchased at most grocery stores or gas stations, etc. You’ll want enough ice to fully cover the bags in a cooler. The idea is to get a nice even coverage, and to avoid any warm spots.
Storage/Freezers
Obviously, the sooner you harvest the trichomes from your flower, the fresher it will be. However, when properly stored it will retain the majority of its freshness for a considerable amount of time, meaning months or even years.
The four main factors that you’ll want to be aware of are temperature, moisture, light and air.
Light should be the easiest to control, however if you store your buds in a larger freezer that commonly has light exposure (such as a walk-in freezer) consider putting them into opaque containers or bins to fully protect them. As mentioned above, a vacuum sealer will be ideal for removing as much air as possible. For moisture, be sure to keep your frozen stock at a constant temperature. If you’re continually opening and closing the freezer or cooler, the temperature will vary, and some of the ice that formed from the water inside the plant may begin to melt.
The Harvesting Process
The “live” in live rosin refers to the fact that the bud is trimmed directly from the living plant and immediately frozen. As such, you’ll want to have your bags, ice and storage containers ready to go. Set up all of your supplies in the grow or nearby and simply cut, trim, bag and put it on ice. Later in the process, when the flower goes into an ice bath, the trichomes will be frozen and agitated off of the buds, so minimal trimming is required. Aim to get off the stems and larger leaves, but meticulously removing small leaves isn’t as necessary.

It’s not as if your terpenes and cannabinoids will evaporate the instant they come off the plant, but the idea is just to move in a timely manner. You’ll also want to be aware of keeping your ice and flower cold as you work. Having some helping hands will help things go smoother and more efficiently.
Refrigeration
Aim to store your frozen material around -4℉. This temperature has been studied by experts and is generally considered the best for preservation of THC and terpenes.
Hash Rosin: Washing Process Discussion
Now that you’ve got your primo starting material harvested and prepped, the next step is to wash it. Though it may appear powdery in some forms, THC is not water soluble, meaning it can’t dissolve or mix into water. There are some edible preparations that will dissolve in liquid, but these are specially crafted using additional processes, it is not a natural characteristic of cannabinoids. Terpenes themselves have differing levels of water solubility, however freezing also helps keep them from being absorbed. Lastly, the ice water preserves the actual trichome.
This is what makes harvesting ice water hash possible. In creating an ideal environment for the trichomes to detach, hash makers can cleanly and efficiently harvest them for the best rosin. As mentioned, this high level of preservation is necessary for creating full melt preparations and the top-shelf products you see lining dispensary shelves.
How to Make Ice Water Hash
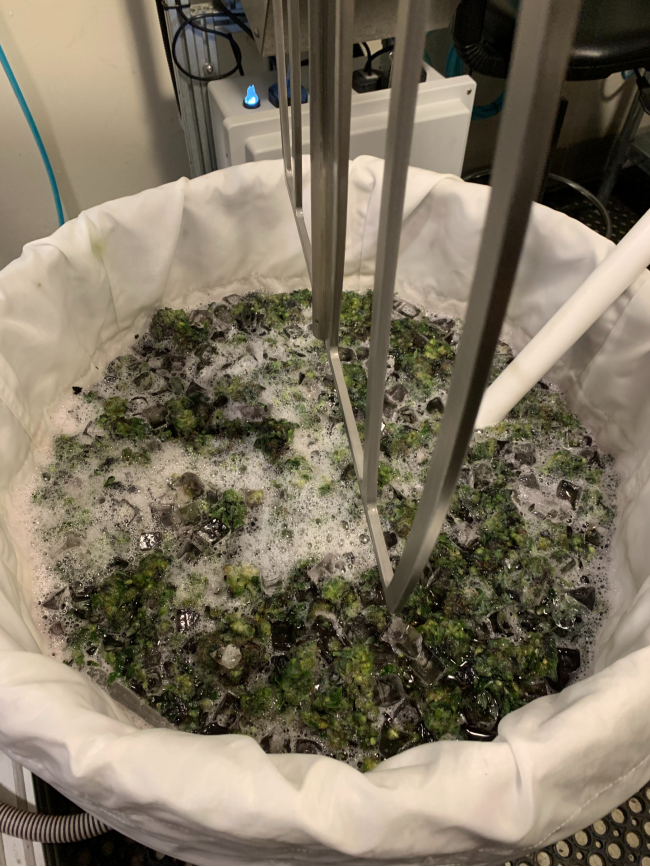
You’ll begin in one large vessel lined with a large filtering bag liner. This first bag will have the largest micron size of all the filter bags at 220 microns, and this is to allow the majority of trichomes to easily detach and fall through, but will require further refinement to reach high quality.
Begin by loading the vessel with ice, water and fresh cannabis. How much cannabis you’ll be able to process will be determined by the size of your vessel, but be sure to allow for room for it to circulate and agitate. The motion of the buds being agitated is a vital part of getting a good yield, so be sure not to overload your vessel. Additionally, be sure to let your cannabis soak in the ice water bath for roughly 20 minutes prior to agitation. This will allow the trichomes to fully acclimate and brittle up.
Hash Maker’s Note: For this step, you’ll be wanting to use reverse osmosis (RO) water and ice. Reverse osmosis is a process of filtration that achieves extremely high levels of purity, and ensures that no contaminants are making their way into the final product. These systems can range from a few hundred dollars to a few thousand, so what level of investment you’re looking at will depend on your needs, but if you’re investing in a professional hash making setup, it may be worthwhile to consider getting a dedicated reverse osmosis purification system. The ice that you get from most grocery stores and gas stations will be RO filtered, but be sure to check its purity with a water testing kit if you’re unsure.
Once the bud is loaded, allow it to soak for 15-20 minutes before agitating it with your paddle. You’ll want to agitate thoroughly but gently, making sure that the starter material gets well worked and stirred. While subsequent washes will be a natural part of the process, you also want to ensure that there’s enough coming off with each round.

If you’re using a system like the Bruteless from PurePressure, you can monitor the storm of trichomes as it collects in the bottom of your vessel. After agitation is done, carefully remove the primary starter material from the main filter bag and drain the collected trichomes. Next, this trichome-filled ice water will be emptied into your bubble bags and collection vessel for further filtration.
Bubble Bags
The next step is to pour the resulting sluice of water and trichomes through your bubble bag filtration setup. As the water moves down through the layered bags, the tiny micron-wide holes will catch finer and finer particles of trichomes at each stage.
Take your time and be careful as you pour; you don’t want to spill any of those coveted trichomes! As you move through the collected water, you’ll notice the ice water hash begin to collect on the filter bags. Once your initial run is complete, remove the bags in turn (giving a slight final wash down at each step), and scrape and collect the resulting hash using a cold spoon onto a tray lined with parchment paper. You can separate these collections out by micron size (and subsequently, star rating) or mix them all into one batch to capture the full spectrum of collected trichomes.

At this stage, there should still be some water mixed with trichomes at the bottom of the basin you used the bubble bags on. It is ideal to reclaim this water and run it through the filtering setup again a time or two to make sure that you’re getting all you can from your harvest.
Enhanced Equipment
Traditionally, before the rise of the commercial cannabis market, ice water hash was often made using large plastic garbage cans as a catching container. In the modern market these receptacles have advanced into specialized vessels made specifically for hash washing. PurePressure has developed a purpose-built hash washing vessel in the Bruteless line that streamlines and elevates each element of the washing process to get better, more consistent results from your hash washing.
However, beyond working better, there is another reason to heavily consider investing: safety. The ultimate goal of rosin and hash is to be consumed, and we want to be sure that anything we are consuming is as safe and pure as possible. Unknown or less trusted companies might manufacture with inferior materials, and there’s a chance that those materials can chip or flake and wind up in your hash. This could come from parts breaking, low quality metals, or scrapped plastic. This can be especially important at any stage in the hash making process that involves force and agitation, as things are more likely to break or scrape.
Your setup will ultimately be dependent on your space and funds available, but keep in mind that cutting corners on equipment is often a surefire way to introduce problems into your production. If you’re looking to go with the best, we recommend the Bruteless. We’ve had the opportunity to objectively review the Bruteless ourselves, which you can read about here.
The Bruteless Hash Washer
As we’ve mentioned, a dedicated hash washing vessel will greatly elevate your harvesting process, and increase the quality of your hash. PurePressure’s Bruteless 20 Gallon At-Home Hash Washing Kit is the perfect all-in-one option to get started washing yourself. The thermal sleeve helps to maintain even water temperature and reduce overall ice usage by up to 50%. Inside, a beveled false bottom allows the trichomes to safely settle away from the agitation environment, maintaining ideal quality. If you’re looking to process larger amounts of flower, they offer larger 30-, 44- and 65-gallon options as well.
Wash Capacities (fresh frozen, wet weight)
- 20 Gallon: up to 2,500 grams
- 30 Gallon: up to 5,000 grams
- 44 Gallon: up to 10,000 grams
- 65 Gallon: up to 15,000 grams
Collection is easier with built-in access ports to customize your setup and skim, fill, drain, attach hoses or a sight glass, and much more. Overall, a better washing vessel will help you to harvest more trichomes, of higher quality, with greater efficiency. It may require a steeper investment, but the payoff down the line is hard to argue against.
Dry Sift Rosin
If the process of washing hash seems daunting, perhaps dry sifting might be more appealing. Separating trichome heads from cannabis is one of the oldest methods of making cannabis concentrates, and before modern ice water washing techniques, that came in the form of dry sifting.
The dry sifting process shakes or beats the trichomes off of the plant material and onto screens where it is then sifted to remove excess plant matter and other unwanted material. The underlying concept is the same as ice-washing; dry sifting simply uses a different means of separation to achieve the same goal.
In general, whether dry sifting is superior to ice water hash washing is a matter of some debate. Dry sifting uses only mechanical motion (meaning movement) to make hash, and for some, this simplicity only adds to its purity. This is debatable as it is considerably more difficult to fully separate out all of the debris and plant matter from the harvested trichomes when dry sifting without extensive static cleaning and a lot of skill. On the other hand, ice water washing tends to be far more consistent, easier, and results in higher yields, with the purity tradeoff being only water. Ice water harvesting makes separating debris and plant matter easier, and using reverse osmosis water eliminates any possibility of contamination, so it would seem that this distinction is somewhat arbitrary, yet you’ll still find that different hash makers have their individual preferences. Dry sift rosin is simply dry sift hash that has then been pressed
However, it is worth noting that starting material will differ between the two. Dry sifted hash is made from flower that has first been dried and cured. It cannot be made using fresh frozen cannabis because the higher water content would keep the trichomes from easily separating. As we’ve discussed earlier in the guide, some amount of cannabinoids and terpenes will naturally be lost in the curing process, and this is one of the reasons that some hash makers maintain that ice water hash from fresh frozen cannabis is a better product. Alternatively, one key difference between the two is that that dry-sifted hash will not require time in a freeze-dryer to purge any remaining moisture.
Why Dry Sift?
While it may seem that dry sifting and ice water washing are at opposite ends of the hash masking spectrum, it can be more beneficial to view them as alternate options in the same tool set. Similar to hydrocarbon extraction, dry sifting can be utilized to get more out of trim or other mid-grade cannabis material that hasn’t been fully harvested. Furthermore, as mentioned, access to fresh frozen cannabis simply isn’t attainable in many situations, but access to premium cured cannabis is. If you’re looking to make the highest quality hash possible with what you have available, dry sift hash will make for much better pressing material than straight cured bud. It is yet another step in the refinement process that might not be strictly necessary in order to make any rosin, but will have a large impact on making better rosin. As we’ve discussed, when looking to improve your rosin making skills, these tiny steps are what separate good from great.
Materials for Dry Sifting Hash
The general concept of dry sifting is that plant matter is contained in some way above a screen that can be shaken or beaten, and there’s a tray to catch the sifted trichomes beneath it. Going back centuries, this was achieved through a type of drum setup. A silk screen would be stretched tight over a basin, and then cured cannabis would be placed on top. The mass was then covered with another cloth to hold it in place, and that cloth would then be pulled tight and secured, leaving the cannabis help tight in between. Hash makers would use sticks to beat at the pile of cannabis like playing a drum, and the trichomes would fall through the silk sheet into the basin below. You’ll notice this process closely resembles a bubble bag setup, and that’s no coincidence. There are many modern versions that utilize a similar method using modern materials. Silk screens have been replaced by nylon or stainless steel screens, and the equipment they collect into is food-grade stainless steel, but the base concept is the same as it was thousands of years ago.
Trichome Sifting Equipment
Today, the beating has been replaced with simple shaking, stirring or tumbling. Cured cannabis is placed in a pollen box or mechanical trichome separator and moved about in some way that the trichomes fall through sifting screens.
On a professional level, industrial separators scale up the concept. For example, the GreenBroz Alchemist 420 uses a cube design with large screens placed on some of the cube’s surfaces. A motor tumbles the cube for a set amount of time, and this natural movement causes the trichomes to fall off and become trapped behind the screens. The large receptacle allows for batch harvesting, and the motorized operation means processing more plant matter with less energy, but the ideal is no different than what takes place when you shake your standard grinder.
Filter
Just as bubble bags are crucial to ice water harvesting, sifting screens and filters are the primary factor in dry sifting. Screens will often be denoted by micron size, just as filter bags are, however this isn’t always the case. Take note that screens will sometimes be referred to in measurements of LPI (lines per inch). Whenever possible, aim for something measured in microns, as this is a more exact measurement. LPI is measured in the number of filaments per square inch, however this doesn’t take into account the size of the filaments. Microns measure the actual size of the holes in the mesh, regardless of the size of the filaments that make them. That being said, there are plenty of conversion charts for LPI to micron, with 100LPI = 150 Microns being a good general conversion.
Collection Tools
You’ll want a wide, flat tool to scrape up and collect your harvested trichomes. A painter’s scraper is what’s most commonly used, but be sure to choose one that feels comfortable to you and suits the size of your needs (too small and you’ll be scraping for days, too large and it’ll be difficult to carefully manipulate).
You are working with a powdery substance, and as such, it is liable to blow about or spread with even a slight breeze or gust. Having a small brush on hand to use in tandem with your scrapper can be a huge help to collect those errant particles. Look for something soft (so as to not fling THC on accident) and with fine hairs (to handle the small particles). Think of the difference between a makeup brush and a paintbrush, and how each is more suited to their respective materials. You’re aiming closer to the makeup brush, but it needn’t be too delicate.
Container
Many hash makers prefer to collect onto trays lined with parchment paper, and this makes good sense if you’re planning on pressing your dry sift, as parchment won't stick to it. However, be aware that if you’re harvesting onto a wide, flat surface, you’ll want some sort of barriers to keep things in place, or a lid to keep it down while you’re moving about. More or less, anything dry and clean can work, but know what you’re working with and take care to contain it.
What to Expect
Speaking generally, dry sifting hash is one of the easier collection methods. It takes little more than movement, and there aren’t a lot of places you can mess up. Managing the powdery results is about as complicated as the process gets. While ice water hash washing isn’t necessarily complicated, dry sifting is even easier, as there is no water to manage. Because of this, it’s a great starting step to larger hash making.
Process
First, to prepare your cannabis for dry sifting, it’s a good idea to freeze it first. This is different from fresh-freezing cannabis, in that what we mean here is to take dried, cured cannabis and freeze it. This will cause the trichomes to become more brittle and thus will break off more easily as the cannabis is shaken or tumbled.
Next, load your prepared material into the sifter. If you’re making high quality hash and rosin, you’ll likely be making use of a mechanical separator. Simply load your frozen cannabis into the machine, being sure not to overload it. Just like a washing vessel, you’ll want to fill it to about ⅓ capacity. You can go up to about ½, but it’s ideal to keep it under that point to allow for optimal movement (and thus better trichome agitation).
Note: Some hashmakers are in the habit of using dry ice to help expedite and maximize the removal process, as it will get your trichomes instantly cold, dry and brittle. However, be aware, there are some significant downsides to this method. The rapid changes in temperature can cause damage to the delicate trichomes, ultimately causing them to rupture, which both degrades the cannabinoids and terpenes within, and can introduce excess plant matter into the resulting hash.
With the sifter loaded, simply secure the load, and turn on the machine and let it run for a while. 10-15 minute intervals should work well, but keep a close eye to ensure you’re not collecting any unwanted plant matter or over-agitating. If you’re sifting manually by beating or shaking, aim for a similar period, but either way, you’ll want to check your progress at times before letting it go too long. Just like ice water hash washing, this process can be repeated several times to get as much available trichomes as possible. As you develop your skills, you’ll begin to get a feel for when there’s still trichomes left to get, or when you’re shaking an empty can.
What to Look For as You Go
What does good sifting look like? Dry sift is graded on a star system similar to ice water hash, and thus you’re aiming for well formed trichome heads with good coloration and as absolutely minimal plant matter as possible. A magnifying glass or jeweler’s loupe can assist in checking, but your plain sight should give some general input as well. As you sift, check your results periodically so see how the sift is developing. Is it getting lighter or darker? Are the particles even? If you notice larger particles are getting through, check to make sure there are no holes or breaks in your screen.
How to Know When You’re Done Sifting
Overworking your starter material too much runs the risk of getting more and more plant matter unintentionally, however it’ll likely be finished long before you get to that point. Repeating your sifting process 2-3 times should get you about all a batch has to offer. Dry sifting will have a typical yield of about 15%-25% by weight when using a professional separator, however that will vary depending on the strain and batch (and vary even more if using DIY or hobby-grade setups). Furthermore, be aware, usually only the first 8-10% is any good, beyond that the quality reduces a greatly. When you're in the 20%+ range typically a lot of that "yield" is just inert organic matter and debris.
After a few collection rounds, a drop off in yield should become fairly evident, and you’ll know when you’ve finished. Remember that overharvesting can result in degrading the quality. If you’re noticing an even amount of trichomes come out at each collection after multiple rounds, you might want to consider longer agitation intervals, as not all of the trichomes are shaking off. Ensure that your starter material is good and dry, or it may need another trip through the freezer to get off the stubborn bits.
Collection and Storage
First and foremost, you’ll want to collect in a cool and dry environment. This will keep the dry sift from clumping or gathering moisture.
To collect your dry sift, you’ll want a scraper tool that is sturdy and won’t chip, flake or break. It should be wide and flat to easily manipulate the trichomes. Strong plastic or metal scraping tools are ideal. Always ensure that your tools are clean and in good condition before each use, and that you have a receptacle to place your harvested trichomes in.
Method
Start gently at a corner or side and collect towards the center of the collection area. Remember to move gently and deliberately, sift hash’s consistency makes it easy to spread accidentally.
As you go, regularly collect your piles, and put them in a container. It’s also recommended to wear a mask (both to keep you from breathing on the hash, and to keep the hash out of your lungs).
Storing Dry Sift
Storage of dry sift should be just like ice water hash, in a cool dry place. A freezer is ideal, and will help to preserve those vital cannabinoids and terpenes. Similarly, aim to reduce air and light exposure as much as possible.
Pressing Rosin
How to Press Rosin: Step-by-Step Process
As we’ve mentioned many times in the guide, the wonder of rosin concentrates is that they are formed using nothing more than heat and pressure. As we’ve covered, trichomes on the cannabis buds contain the many special terpenes, cannabinoids, esters, and other phytocompounds that we uptake when consuming cannabis. The ideal trichome is shaped like a stalk with a bulb at the end, a little like a streetlight. The highest concentration of all of the cannabinoids and terpenes on the plant live in that little bulb at the end of the stalk.
The parts of the plant that are not these vital compounds are made of plant cells, and thus, like all living things, made of carbon. When cannabis is burned, this carbon becomes the ash and resin in your bowl, and the exact thing you want to keep out of your lungs.
When hash is sifted, it is these tiny bits of plant material that hash makers are aiming to sift out, keeping only the trichome head. When those trichome heads are pressed into rosin, the heat helps to separate out the cannabinoids and other good stuff, while the filter bags hold back the miniscule bits of plant matter that remain, even further purifying the resulting concentrate. This is the entire reason why hash is pressed into rosin, in an effort to remove every last possible bit that isn’t cannabinoids, terpenes and phytocompounds, (aka, “the good stuff).
Main elements of pressing
Rosin press
A rosin press is a machine consisting of two opposing heated pressing panels. The pressing arms can either be manual or hydraulic, or pneumatic but will need to be capable of providing sustained and even pressure. Manual and Pneumatic presses tend to do this task the best when pressing rosin as they allow for greater finesse in the pressing process. Taking the Helix as an example, the live load cell enables for fine-tuned adjustment throughout the pressing. Pneumatic presses can also attain this level of refinement while maintaining even, accurate pressure, and are generally more reliable than hydraulic presses for the purpose of rosin pressing. This is due to differences in compressing liquid versus compressing air for pressure. What hydraulics gains in brute force, it sacrifices in detail. Ultimately, hydraulic presses are the cheapest option of the three, though they tend to offer the least degree of precision.
Heat ranges are incredibly important in determining the quality of your rosin as well, so the ability to finely control plate temperature should be a main feature you look for in your press.
Sifted hash (containing those vital trichome heads) is placed between these two plates inside of filtering bags with small holes, which are measured in incredibly small increments called microns (one millionth of a meter).
Filter bags
Before it is placed in the rosin press, the sifted hash or flower material is placed inside a filter bag. As we’ve seen in the processes above, the goal of making rosin is to remove as much of the plant matter as possible while keeping the essential cannabinoids, terpenes and other phytocompounds. Filter bags have incredibly small holes in them that allow only those compounds to flow through as the hash is heated and pressed, and thus separates out plant material to only trace amounts of.
If you’ve ever dabbed ice water hash and pressed rosin back-to-back, you’ll notice the difference in the residual left in your banger or glass insert. The miniscule “coffee grinds” residue that ice water hash has is due to the higher presence of plant matter.
Bag quality is important here for a few reasons. You’ll be subjecting the bags to a high amount of pressure, and thus breakage is a possibility. Using high-quality bags will help to reduce issues with bursting. For the same reason, the uniformity of the bag is also important, ensuring that all those tiny holes are actually the size we hope they are, and that they are all the same size (which not only might let in more plant matter than desired, but also cause breakage). Lastly, you want to make sure that the bag itself is made of reliable material that won’t break or wind up in the rosin.
Understanding Microns
Filtration screens and bags for trichomes are typically denoted by the size of their holes, which is measured in units of microns (μm). A micron is one millionth of a meter, so we’re talking about incredibly small particles. For a more tangible understanding, a sheet of paper is about 70-180 microns thick.
This bubble hash filter bag kit from Boldt Bags (a common industry-standard kit of ice water hash bags) comes with 8 different micron sizes, including 25μm, 45μm, 73μm, 90μm, 120μm, 160μm, 190μm, and 220μm. The sweet spot for harvesting the best trichomes tends to be the 73μm, 90μm, 120μm range. As the trichomes move through these increasingly smaller holes, the trichome heads (which are about ~80-120μm wide) will be separated from both larger and smaller parts of plant matter and other parts of the trichome stalk.
It is a common misconception to believe that smaller microns = a better grade of hash. The thinking goes that the smaller the micron, the less plant matter is getting through, though that’s not necessarily the case. Think of it more like a change sorter where in order to get out only quarters, you make holes that are exactly quarter-sized among levels of other holes that are larger and smaller. The nickels and dimes will fall in with the quarters from the top, but they’ll also be diverted out through smaller holes as the change filters through the layers, leaving only questers where we want quarters. For hash making, the goal is to get only trichome heads, so similarly, the smaller micron levels help to filter out unwanted bits the same way that the larger micron sizes do.
This is why hash is graded on trichome quality rather than what size micron filter the hash went through. The very best trichomes may have wound up somewhere in the middle of the stack of filter bags, or may be grouped near the top or bottom depending on the unique qualities of a given batch. Thus, hash makers harvest the trichomes and assess them afterwards to establish their true grade.
Heat and Duration
The heat and duration of your press will be among the most important factors of the entire hash making process. Think of this part as the “recipe.” A bit too much or not enough of either will ruin the final product, the same way that you can burn a cake. As you practice your rosin making, you’ll get a better understanding of the temperatures and times that you prefer or think work best.
Ideal temperature and pressure ranges for rosin pressing are 160℉ to 220℉, however there is a reason that these are presented as ranges and not exact numbers. This is because each batch or hash or flower will have its own unique density and consistency. Some flower may not yield well at lower temperatures, while other batches will perform extremely well. It may take doing some small test batches to determine the ideal heat for the best yield/terpene and cannabinoid retention ratio.
Determining Ideal Heat
In general, a warmer press may have a higher flow and yield, but may not capture as many cannabinoids and terpenes, but that’s not always the case. Regardless, going too hot on the pressing is a sure way to ruin a batch, degrading your rosin into something undesirable.
In order to determine an ideal heat, you’ll want to do small test runs before committing a full press.
The temperature range can also affect the final consistency and look of your rosin drastically, which is why it’s important to take note of how different parameters affect different strains. With a rosin press from PurePressure, you can even save preset settings on a strain by strain basis to keep all your settings consistent and dialed in.
Temperature Ranges
You’ll want to avoid going below 160℉ and above 220℉. Though there will be variances within that range from batch to batch, on the low end you’ll not have enough heat to get the compounds to emulsify and flow, and above it they will begin to burn. Again, for every rule there’s an exception: when using extremely high quality hash as starting material, some people press at 140°F or even below and have stellar results, but that is not very common.
A general rule of thumb is that 160℉ to190℉ constitutes a “cold press” and 190℉ to 220℉ is a “hot press.” Cold pressing and hot pressing can strongly impact the final consistency of your rosin, with colder presses yielding more budder-y end products and hot presses resulting in more shatter-like concentrate.

The temperature of your press can also impact yield and flavor. Cold pressing typically results in high flavor and terpene preservation but lower yield while hot pressing retains less terpenes (still high terpene preservation if you don’t exceed 220℉) and can increase overall yield size. Again, these are general rules. Cold pressing tends to yield less when pressing flower, but can provide substantial yield when using premium hash. The result is often re-pressed again at higher temperature to fully harvest as much as possible.
The key takeaway to remember is that temperature will be one of less-defined variables from batch to batch, and will take gathering some experience to get a feel for. For this reason, it’s important to take good notes as you refine your temperature ranges, and what effects they had on the final product.
Determining Ideal Press Duration
The duration of how long you press your starting material for will depend heavily on the specific strain being pressed, as well as the amount of heat used. Generally speaking, if you use higher temperatures it’s best to have shorter press durations (45 seconds to 3 minutes) and whole low temperature presses can take a much longer time (anywhere between 1 and 5 minutes).
There is no uniform duration to apply to rosin pressing, however, as you become more experienced you will begin to notice what parameters yield the best results. Keep detailed notes on every press and itemize what worked well and what didn’t. It’s also a smart idea to consider pressing a small batch initially if you are brand new to rosin pressing or testing out some new procedures. The most important factor when it comes to heat and duration of rosin pressing is to keep a close eye throughout the entire process. If you see your rosin burning or coming out dark, that’s a sign you have pressed too long and too hot.
Duration really does depend on what you are pressing and the qualities that the strain has, but the general rule is the less time on the heat plates, the better.
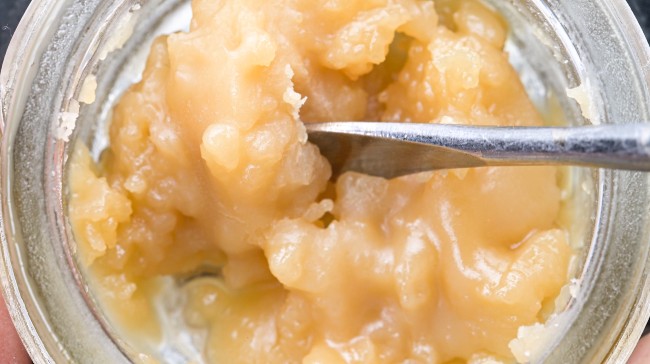
Hash Star Rating System and Quality
While great rosin can be made from a variety of different starting materials, it is undeniable that the best rosin can only be made from five or six star full-melt bubble hash. Full melt indicates high purity and almost 100% pure trichomes, leaving no charred residue when dabbed on its own. When pressed into rosin, full-melt bubble hash offers an unrivaled flavor experience that is consistently sought after by concentrate enthusiasts.
Pressing rosin from lower star-rated hash is of course doable and can yield some excellent results. This rosin can be perfect for making non-smokable products like edibles or topicals. However, if your goal is to produce top-tier, high-quality solventless hash then five star or full-melt starting material is a must.
Preparing Your Starting Material
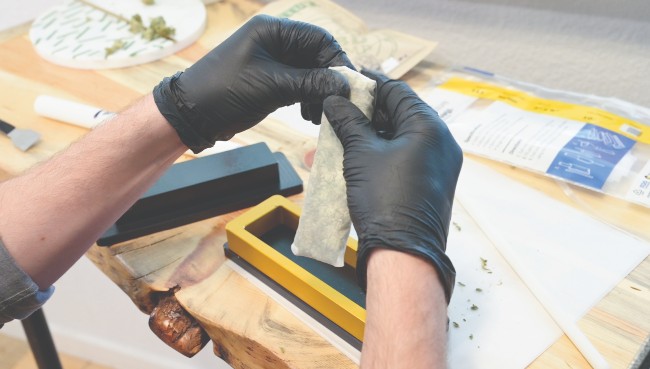
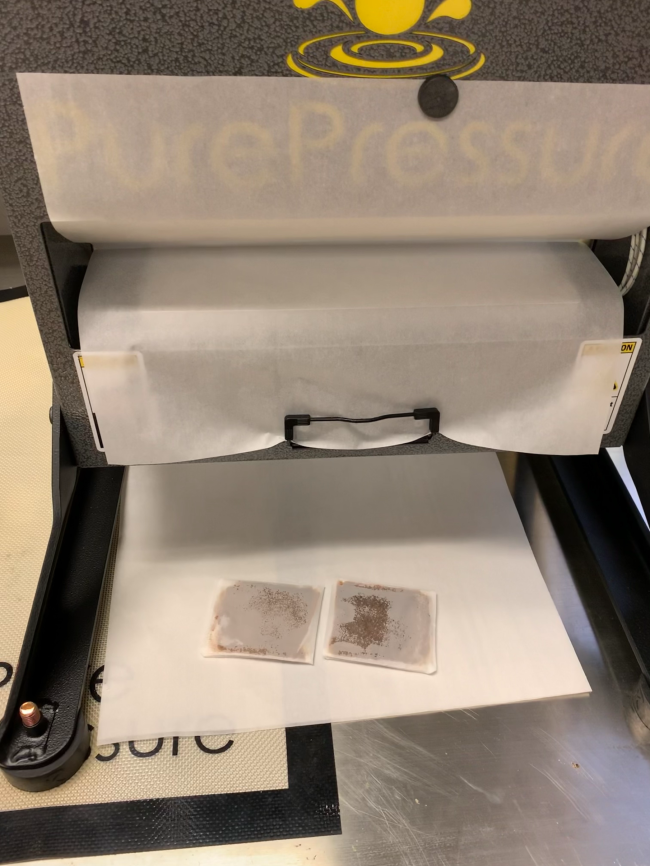
Whether you’re pressing flower or hash, you’ll begin by loading it into filter bags. As discussed, the filter bag is the final step in separating plant matter for your concentrate. No matter what brand of filter bags you use, there are a couple steps to take.
First things first, choose the right size filter bag for your needs. We’ve outlined some common sizes below and what starting material they work best with.
Filter Bag Sizes and Best Uses:
- 25 micron: Hash and Sift
- 36 micron: Kief and Bubble Hash
- 72 micron: Kief and Bubble Hash
- 90 micron: Flower and Shake
- 115 micron: Flower and Shake
- 160 micron: Flower (High-yielding)
Next, turn your bag inside out (PurePressure has a great Quick Flip tool for this). Any time you use a filter bag it’s important to turn it inside out to avoid potential blowouts and maximize surface area.
When it comes to loading the bag it really depends on your starting material.
- Flower: Place unground nugs into the bag, carefully making sure not to pack too tight. Once loaded, break up the flower gently by hand and eliminate any big clumps (be sure to remove any stems or sharp pieces as they can pierce through your rosin bag)
- Dry Sift: Using a funnel, gently pour in your sifted trichomes
- Bubble Hash: Similar to dry sift, use a funnel to place the ice water hash into the bag
No matter the starting material, leave about an inch of free space at the end of the bag (you can cut the bag slightly if you have a lot of extra space).
Importance of Proper Preparation
Taking care in prepping your material in the filter bag will result in better pressings. In order to get an even press (thus resulting in better yield), be sure to evenly distribute the flower or hash in the bag. First gently press it into form with your hands as you fill. Once the bag is filled and shaped, it’s ideal to form it into shape using a tamp or weight. Remember to use a light touch, this step should not involve any actual pressing, just light pressure to give it shape. Evenly forming and filling your starter within the bag will also help to avoid blowouts.
If you’re looking for a professional option, PurePressure makes a pre press mold that can be prepped in a refrigerator beforehand. Why a cold press? Hash can melt from just the heat of your hands, so keeping the pressing surface cold ensures that none of the trichomes are affected before making it to the rosin press.
Preparing for Collection
The formed and filled bag is then placed between parchment paper to be pressed. Be sure to secure your paper in place using the machine’s clips. The bag should be placed evenly in the middle of the pressing plate,
Parchment paper
Adding a 1-2 inch fold to the end of your collection parchment paper can help to catch any potential drips. Also, it’s important to be sure to use enough paper for full coverage and collection of your rosin, we don’t want any of that precious material to wind up on a floor or counter. If your parchment seems short, it’s always a better idea to remove it and use another sheet to start over.
Also be sure that you are using parchment paper. This is another note that may seem obvious, but you want to be sure that you aren’t using wax paper. Though the two look similar, they are treated with different coatings and will not work the same. Parchment paper has a silicone coating, which is resistant to heat and sticking. Wax paper has, as the name implies, a wax coating that is susceptible to heat and may melt, potentially mixing with your warm rosin and ruining the batch.
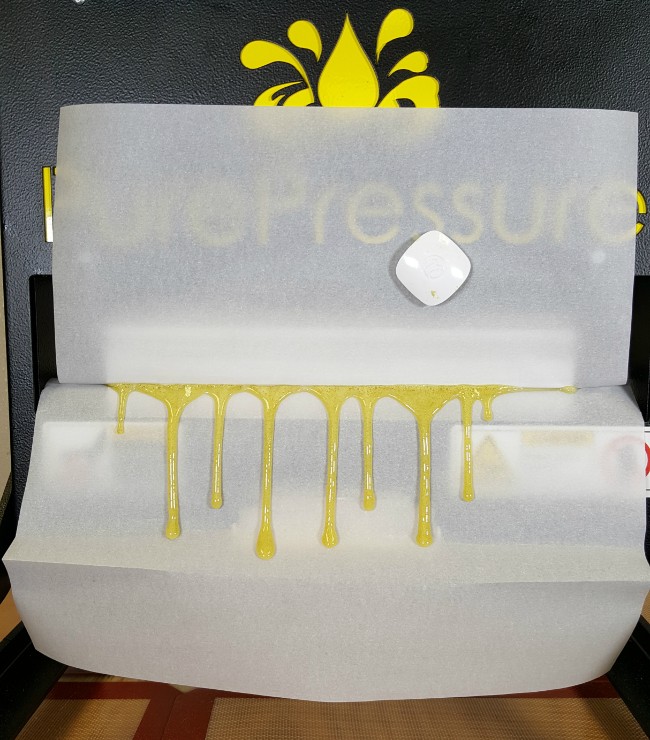
The Rosin Pressing Process
As simple as it is, the actual pressing process is one of the most important factors in determining the ultimate outcome of your rosin.
We’ve been discussing many of the different parameters, settings and stipulations of pressing rosin above, and now it’s time to apply all of that to the actual pressing process. As you know, the quality of your starting material is crucial to make good rosin. The quality of your press can also be a major factor in the overall outcome and yield as well.
Choosing a reliable, purpose-driven machine like PurePressure’s line of rosin presses will not only result in better rosin, but also a more consistent experience and quality time and time again. That being said, let’s start pressing!
Rosin Press Settings
Before you initiate a press, be sure you double check all the settings on your machine. This typically includes temperature and press time, but different equipment may require additional parameters to be set.
As mentioned above in the discussion on heat and duration, aim for a range between 160℉ and 220℉, and a range of one to five minutes for press duration. These settings will be different for every strain you press, so make sure you keep track of what’s working and what’s not. Units with saveable presets, for example on PurePressure’s Helix and Helix Pro rosin presses, are perfect for dialing in the right parameters, then “setting and forgetting” more or less for consistent results.
Hashmaker’s Notes: While presets are an incredible asset to have on your side, even the same strain can vary depending on a multitude of factors. If you’re not seeing consistent results from presets, it could be because of inherent differences in starting material.
Using Presets
PurePressure’s machines come preloaded with ideal time, temperature, and force settings for all different types of pressing based on bag size. You can also adjust each setting with just a touch of the screen, and creating new preset recipes is as easy as setting new parameters, doing a run and hitting save.
For the best results, keep a record of how each recipe performed for your given starting material.
As you take note of the quality of your resulting product, and familiarize yourself with the unique characteristics of your starting materials, you’ll be able to dial in ideal ranges for yield or terpene and cannabinoid retention, and reproduce the best results consistently.
What to Expect when Pressing
We’ve been stressing the importance of constant quality control checks throughout the entire hash making process. In this stage, it is even more crucial to monitor your process as one wrong step could tarnish an entire batch.
Keep an eye out for signs of distress in your filter bag. If the tension seems to be ramping too severely, immediately remove pressure to avoid a “blowout” where the filter bag ruptures and plant matter is incorporated into your hash. Other signs that may signal an adjustment needed are: dark colored resin, a burning smell or simply no sign of any extraction happening. Really, the only parameters that need to be adjusted here are temperature and press duration. Keeping an eye on things throughout the process ensures you can make adjustments as needed and gain valuable insight for future presses.
It’s also important to measure your expectations. If you’re only pressing a couple nugs, don’t expect a river of concentrates to start flowing the moment pressure is applied. The yield will be directly proportional to how much starting material was pressed. That being said, if you see a nice light-amber hue and can begin smelling terpenes as their membrane layers are broken down these are both good signs that the press is going well.
Collection
Depending on your yield, collection can take on a number of forms. For commercial processors, most seasoned extractors will create a funnel for their rosin to seep out and run down the parchment paper and into a jar or collection plate.
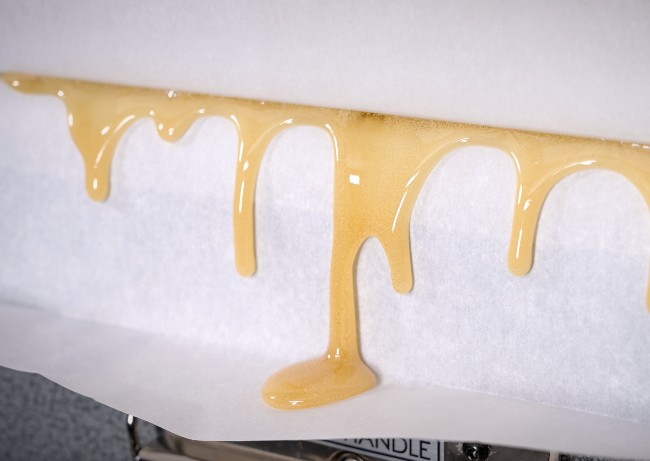
For those operating on a smaller scale, some scraping might have to be done to get all of the resin off of the parchment paper. Depending on the consistency, it may be brittle enough to snap off quite easily. If it is more of a budder, simply glide your hash tool over the parchment paper, being careful not to cause any rips or tears. While a basic dabbing tool or anything else sturdy, flat and clean will work for collecting your rosin, as you develop your skills, it’s worthwhile to invest in a dedicated scraping tool, ideally with a beveled blade, such as the one that Pure Pressure offers. When working with anything smaller, the task can become a bit tedious and eat into your overall production efficiency. Plus, you’ll greatly reduce tears, which is crucial.
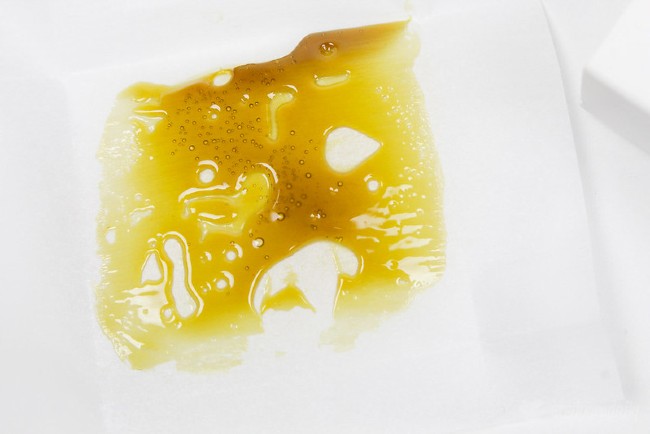
Post-Press Refinement
There’s still one more step in the process after you finish pressing and that’s refining your hash into the desired end consistency and storing it properly. Depending on what type of consistency you prefer, there are several techniques you can employ.
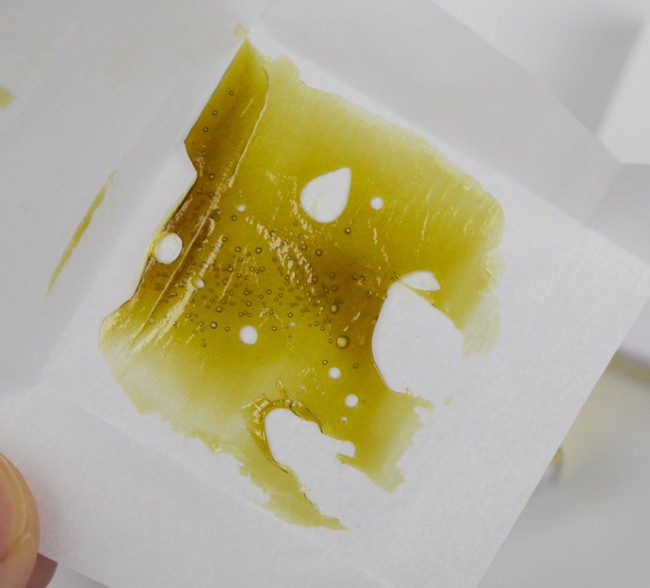
Classic Coin: This consistency is basically rosin in its rawest form. To achieve a classic coin style rosin, make sure you are pressing near the 220℉ temperature mark to ensure a glassier consistency. From there, the product is unmodified post press. Simply collect it and jar it.

Jam: Rosin jam is one of the most sought after consistencies for its stability in non-refrigerated temperatures and ease of use while consuming. Popularized by extractors from the Colorado company, Olio, rosin jam is made by gently reheating the mixture post-press. This encourages the THC to nucleate and create crystal formations. From there, the rosin is jarred up and left to further crystallize. Once ready, several cold-curing techniques are conducted to allow stability at room temperature. The cold-curing process involves whipping the mixture several times and introducing refrigeration at several stages.
Badder: To create a badder-y or budder-y consistency, rosin is “whipped” after collection. This action deliberately distributes terpenes evenly throughout the concentrate and creates a “wetter” appearance due to the terpenes being agitated and brought out. If you’re wanting this consistency, be sure to press at lower temperatures (around 160℉). You can also cold cure badder and budders to help them stay more stable at room temperature.
Sauce: Rosin sauce, aka terp sauce, is typically used for solventless vape cartridge production. To make rosin sauce, you must first collect your rosin, then employ a series of re-presses to separate the THCA from the terpenes. This process is extremely intricate and needs top-tier equipment to be done correctly. Once you have separated out sauce from THCA, you can either reintroduce them or dab them separately.
Storage
After you finish your post-press refinement, it’s crucial to store your hash correctly. Classic coin style rosin will begin to nucleate if left out in the heat for too long, and any preparation can degrade with too much exposure to light and heat.

It’s always recommended to store your hash rosin in a cool, dark place. However, preparations that are budder-y in nature can be left out with more confidence. Depending on how fast you consume concentrates, rosin badders and budders typically do not need to be refrigerated like more classic, unwhipped preparations.
Get Started Making Rosin Today
Early on in the guide, we compared rosin making to pottery, and that’s because, either commercial or homemade, you are the artisan in control of the final product. With rosin, you can make it to your own standards, having a hand in each step. With time and practice, you can elevate your skill to make truly high quality products. In a certain way, there is no upper limit on the tinkering able to be done to achieve the perfect rosin. Even if you have found the perfect recipe, there then becomes other preparations and consistencies to explore, new strains to master–the pursuit is endless.
Such a high level of refinement is difficult to achieve in other concentrate making, due to the chemicals, industrial equipment and specialized knowledge involved, all to make a generally lower-quality product.
In many states, making concentrates without a license to do so isn’t allowed. However, in many of those cases, specifically chemical extraction is banned, and there’s good reason for this. Home hydrocarbon extraction has resulted in numerous explosions and injuries, and is understandably highly regulated. Yet, the reason that some states make the distinction between how concentrates are made is directly related to the difference in safety.
Hash making in general is one of the oldest forms of preparing cannabis, dating back hundreds, if not thousands of years, and in its most basic form requires only a screen, some cannabis and a drum.
Furthermore, hash and rosin making tend not to be resource intensive after the initial setup of machinery. Flower, bags for pressing, parchment paper, water and ice constitute the consumables in rosin making. Compared to sourcing hexane or butane, these are fairly simple and attainable ingredients.
Getting started in making high-quality solventless concentrates is easy, even if you don’t have the best resources at every step. The basic components can be found all over the internet, and you have the perfect resource to turn to in PurePressure if you’re ready to move into more serious production. Even at a beginner level, they have professional options to help you make top-quality hash and rosin. Though a rosin press is likely the largest investment of your setup, it will make all the difference in the final product, and many of the other steps can be done yourself until better equipment can be acquired. At the end of the day even mediocre rosin is better than no rosin, and every bit of experience you gain can be put to good use on the next batch.
Also, be sure to remember: you’ll learn as you go, the biggest step is go. Expect it to be a process of discovery. As mentioned, hash making is a bit of an art, just like baking or woodcarving. Early efforts might have mistakes, but practice makes perfect. Have fun with it!
Learn More About Concentrates