Thursday October 19, 2017
 420 Culture
As Halloween approaches, we thought what better time to get in the holiday spirit. And since many people enjoy pumpkin spiced lattes during the fall season, we decided to put a “Halloweed” twist on the festivities with some pumpkin spiced dabs. In case you’re scratching your head, don’t worry, you read that correctly.
We turned a pumpkin into a dab rig and today we’re going to teach you how to make your very own!
How to Make a Pumpkin Dab Rig
The first thing you’ll need to do before building your pumpkin dab rig is to gather all necessary materials. There are many different ways to customize your rig, so feel free to get creative! For our rig, we used the following:
- Small pumpkin
- Borosilicate glass down-stem (shorter stems work best)
- Quave Club Banger Quartz
- Serrated knife
- Large metal spoon
- Carb cap
- Dabber
- Butane torch
- Some concentrate, of course! (We used OG #18 live resin FSE by Green Dot Labs)

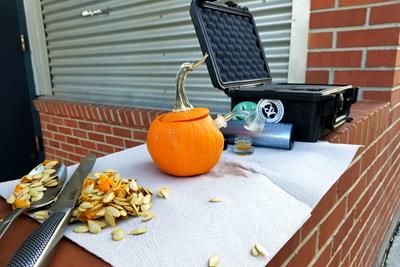
Everything you need to make your very own pumpkin dab rig.
Once you have gathered your starting materials, prepare your work station to avoid a big-time mess. We suggest laying down some paper towel and having a trash bag ready for easy pumpkin gut disposal. When your work space is all set, it’s time to get carving!
Step 1: Gutting your Pumpkin
In order to turn your average pumpkin into a functional dab rig, you’ll need to empty out the seeds and guts. To do so, use your serrated knife to cut a ring around the stem on top of your pumpkin. If done correctly, you should have a nice, circular cap. You’ll want a nice seal when you place the cap back on, so be careful to cut evenly.

Using a serrated knife works best for cutting the pumpkin rind.
Once the cap is off of your pumpkin, use your spoon to scoop out the guts. Try to get all the seeds and remains out of the pumpkin for the smoothest hits. After your pumpkin is free of guts you’re ready to move on to the next step.

Be sure to get all the guts and seeds out for smoother hits!
Step 2: Carving your Pumpkin
When you think of carving a pumpkin, you may be imagining a jack-o-lantern with a spooky smile. In this instance, we’re referring to making incisions for your dab rig’s mouthpiece and down-stem slot. To accomplish these tasks, use your knife to make a small, rounded cut into opposite sides of the pumpkin. When cutting your hole for your down-stem, make sure you are making the cut high enough to accommodate the length of the glass. If you cut too low, you may not give your down-stem enough room for percolation.

Careful not to make your incision too low, or you won’t have optimal percolation.
After you have cut your hole, push your down-stem through it and fit it accordingly. Be sure to check for cracks in the seal, as any air gaps will affect the draw of the rig.

Make sure your downstem is snug and no air holes are present.
When your down-stem is fitted inside the pumpkin, make a similar incision on the opposite side of the pumpkin. This hole will be your mouthpiece. You could add another glass attachment as a mouthpiece, but we decided to go the natural route and take our hits straight off the rind.

Make your mouthpiece incision on the opposite side of your down-stem hole.
Step 3: Finishing Touches
So, now you have a hollowed-out pumpkin with a down-stem and a mouthpiece. You’re almost ready to take some dabs! Just a couple more steps and you’ll be all set.
In order to create smooth, percolated hits, you’ll need to fill your pumpkin rig with some water. Start by pouring roughly a half-cup of water in your rig – or just enough to submerge the diffusion holes in your down-stem.

You want just enough water to cover the diffusion holes of your down-stem.
Once you have achieved optimal water levels, secure your pumpkin’s top back onto the rig. Use your hands to reseal the pumpkin as much as possible.

Try your best to make an air-tight seal with your lid. It will help with improving percolation.
At this point, you can check to see if your rig properly percolates. Take a couple practice draws to test the function. If you’re only feeling air and no chug, then you need to adjust the seal on your cap and your down-stem. If you feel a nice, steady chug then you’re in business!
All that’s left now is to slide your banger into the down-stem’s joint and take some tasty pumpkin-spiced dabs!

A finished pumpkin dab rig ready to use.
From everyone on the PotGuide team, we hope you have a wonderful “Halloweed” that’s full of cannabis-themed fun!
Like our idea? Try it at home and post your results below! Or share any other fun Halloweed activates you like to do this time of year!