
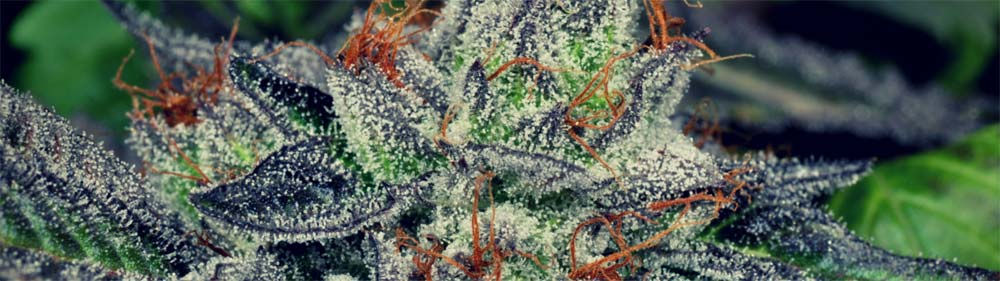
Growing Marijuana:
The Beginner's Guide
Tuesday October 17, 2017
As you may know, the legalization of medical and recreational marijuana across several states has enabled many consumers to become accustomed to purchasing cannabis from a dispensary. Even more intriguing though is the opportunity that legalization has created for adults and medical patients to cultivate cannabis in their own homes.
While the laws, limitations and regulations are different for each state, almost every state with some form of legalized marijuana does allow home cultivation to some extent. Even though it’s completely legal, some people do not take advantage of their right to grow cannabis due to the perception that it is too difficult, expensive or time-consuming.
Interested in growing? Click here to purchase your own seeds and start growing today!
Don’t let the lack of ambition from others discourage you though. If done correctly, growing cannabis at home can be fun, simple and cost-effective! We believe everyone should have access to their own clean cannabis. That’s why we decided to bring you a comprehensive guide to growing marijuana, created specifically with beginner growers in mind.
With essential grow knowledge, you’ll learn the benefits and tips of different grow methods, how to maximize plant yields and grow times, the best harvesting, drying, curing methods and much more! Who’s ready to start their cannabis growing journey?
Part 1 - Understanding Marijuana Grow Mediums
Deep Water Culture Hydroponics
Before starting your cannabis grow, you must decide if you want an indoor growing system or an outdoor growing system. When it comes to indoor growing mediums, DWC, or deep water culture, is a type of hydroponic growing method where each plant’s roots are growing in a tub of water.
One of the main benefits of a DWC system is that it promotes faster growth. Unlike growing cannabis in soil, roots grown in DWC don’t need to expend energy to search for what the plant needs; nutrients are easily accessible by the roots.
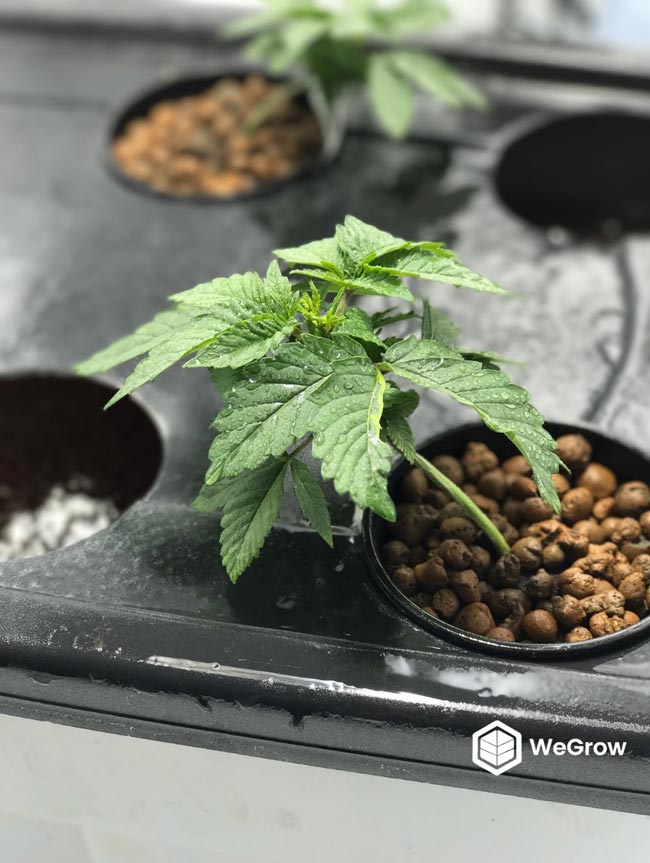
Plants have an unlimited supply of oxygen because of added oxygen from the air stone in the reservoir. Since the plant is spending less energy finding what it needs to grow, it channels that energy to plant growth. In addition, with proper guidance and a quality set up, DWC takes less time to maintain than an average grow.
When implementing a DWC system, a bubbler bucket reservoir system is recommended.
A bubbler bucket reservoir is a simple system that suspends the plant's roots in a highly oxygenated nutrient solution. The roots are submerged in the nutrient-water solution in the bucket and are then replenished, as needed.

The most important growing tip is to check on your cannabis plants daily. As with many processes, the easiest way to fix a problem is in the beginning stages! If something is wrong with your plant in a DWC system, your first step in remedying your plant should always be to change out the reservoir. It is common for root rot to occur when roots are consistently in water, therefore, it is imperative to establish a preventative routine of changing out the reservoir every seven days. Adding beneficial bacteria to the reservoir is also effective in avoiding and combating root rot.
When growing from seeds in DWC, use each reservoir port (or net cup) to vegetate, then pick the strongest looking females to continue growing.
Keeping air and water temperatures under control are also very important measures to take. Air temperature should be 75-85°F when the lights are on and will drop by 10 degrees when the lights are off. Water temperature should remain at a constant temperature at all times. Your empty portholes can be used to change out the reservoir water by using a pump, allowing you to easily inspect what’s going on inside.
A common mistake to avoid when growing with DWC is not checking the pH levels of the water. This is important for any grow! Dirty reservoirs or not using an aerator 24/7 are two additional crucial mistakes, as roots must have excessive oxygen so they don’t drown. While some people like to maintain a completely sterile reservoir with just nutrients and water and no traces of anything alive, there are some good sources of beneficial bacteria that can be added. Bad bacteria is obviously, bad, but we wanted to emphasize the possibility of bacteria that can benefit your grow. To avoid potentially harmful bacteria, be proactive about changing the reservoir water.
In addition, having too many plants in one reservoir can lead to problems such as white powdery mildew. Don’t cramp your plants, instead, we recommend growing one plant per reservoir to allow the roots to spread out and give the leaves and buds more space.
Setting up a water transfer pump for this task can speed up the process. For best results, learn how to flush your cannabis plants.
Flushing your plants by removing any nutrients and salts improves the quality and taste of your final product. By simply draining your bubbler bucket reservoir and adding plain (pH neutral) water for two-three days before harvest, the plant will use all its existing nutrients contained in the stems, leaves and buds.
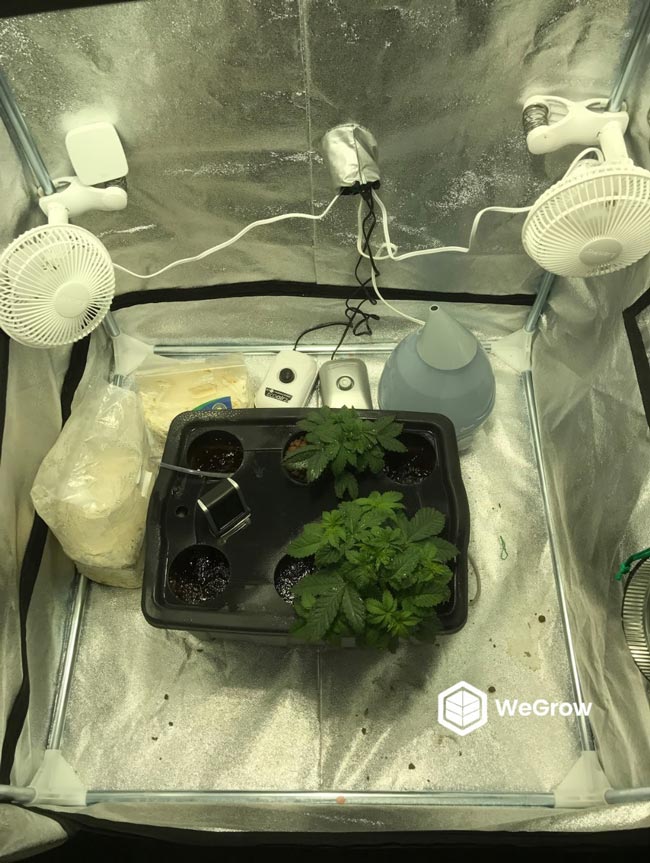
Growing Cannabis with Coco Coir
Coco coir is another great growing method, especially for beginners. It provides the ease of soil gardening with the rapid growth of hydroponics by using fibrous coconut husks instead of a potting mix. Compared to just soil growing, it absorbs moisture much easier, allowing plants to take up more nutrients and retain oxygen more efficiently because of its lighter texture. It also provides a forgiving buffer by reducing shock stress when human errors are made, such as adding too many nutrients, a common mistake.
Coco is much easier to flush than DWC because you aren’t changing an entire water reservoir. In fact, watering coco coir is very versatile. You can use a flood and drain hydroponic system, which is when the nutrient system temporarily floods from beneath the plant, controlled by a pump and timer, instead of dripping from above like most hydroponic systems. You can also use the most recognized top water to waste system, which is simply taking a water pail and watering your plant until water comes out of the bottom of the pot.
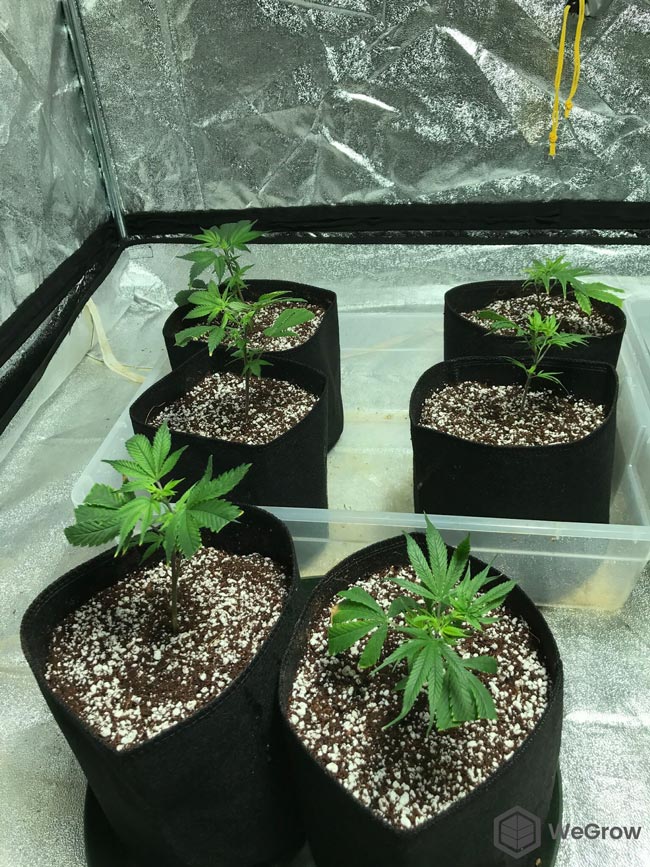
When growing cannabis with coco, good quality coco coir makes an immense difference, especially regarding root development. For beginner growers, a three-to-one coco to perlite mixture is recommended as it requires less watering frequency and holds moisture and nutrients better.
For more experienced growers, a one-to-one coco to perlite ratio is recommended as you are able to water more frequently, giving the plant more nutrient uptake and allowing more aggressive root growth.
With coco, water around the outside of the pot in early stages of growth to encourage roots to reach out and fill up the entire container.
Some common mistakes can occur when growing with coco if a grower allows the coco to get too dry, as the mixture dries quickly. Not checking the pH of the nutrient-water solution and not flushing on a consistent basis are also critical errors, as you are using more nutrients with coco and the excess residual nutrients can cause common nutrient deficiency symptoms.
It’s also very important to use Cal-Mag, or Calcium and Magnesium, in your coco growing medium. Calcium plays a direct role in a plant’s root development, nutrient uptake and protein synthesis. Magnesium is an essential part of chlorophyll production, helping your plants with photosynthesis, as well as aiding in the synthesis of sugars and proteins. Together, the correct amount of magnesium and calcium will help keep your cannabis plant healthy.
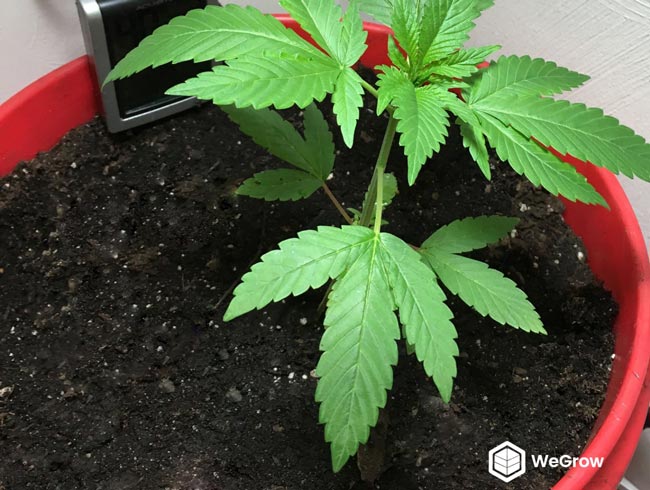
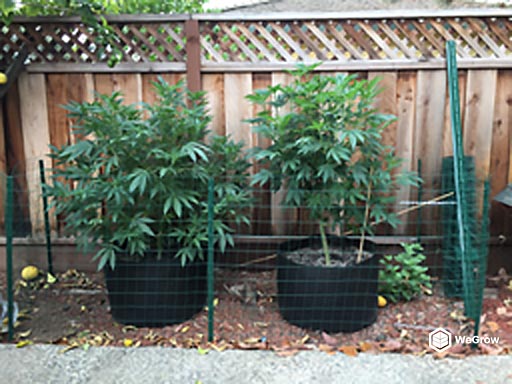
Outdoor Growing
Outdoor soil growing is a common gardening technique that most people with house plants or vegetable gardens are familiar with. Using techniques such as top-fed watering, deep irrigation or wicks are all viable methods to water your plants. You can either use organic, composted soil, or store-bought soil with added liquid nutrients.
To make organic soil, you need a mixture of biolive, alfalfa meal, oyster shell for calcium, blood meal and bone meal, humic acid to keep the roots clean, and kelp. With store bought soil, use organic nutrients and start adding them about three weeks into the vegetative stage. With synthetic nutrients, you must flush them out regularly. Flood the soil with as much fresh water as it can withstand and leave it for a few minutes to allow the nutrients to be picked up, then flood it again to get the nutrients away from the plant.
Always remember, less is more with non-organic nutrients. If you are adding nutrients, a good rule-of-thumb is to add them about once a week.
A benefit to outdoor soil growing is that if you have a good base-soil built up, it’s not necessary to add nutrients throughout the plant’s life cycle. That means less work for you! It is also likely that the smell and flavor profiles of your buds will increase as well.
A common mistake when growing outdoors is overwatering. Wait to water your plants until the first three inches or so, or about knuckle depth, of soil is dry. You can gauge your soil by pulling the container it is in slightly outwards. Not checking the pH after mixing nutrients, or using nutrients too frequently are also common mistakes that you’ll want to avoid.
Don’t use miracle grow or other similar slow release soils. Your plants will not get the correct amount of nitrogen needed during vegetation and they will receive too much nitrogen during flowering.
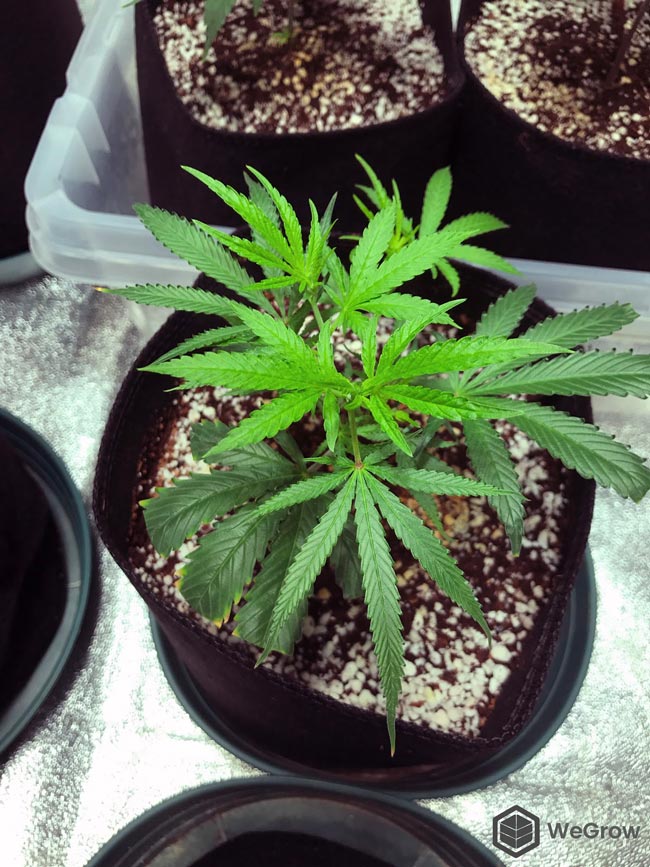
Part 2: Learning Cannabis Grow and Plant Maintenance Techniques
Growers have recorded a plethora of marijuana growing techniques over the years to ensure you make the most of your crop. If you want to maximize yield and maximize the amount of light your cannabis plant receives, it is important to practice bending and securing parts of the plant, or removing parts of the plant altogether. While there are many different methods, it is important to note which ones will be the most sustainable for your growing medium.
Bending & Securing Your Cannabis Plants
Screen of Green (ScrOG)
One technique for bending and securing parts of marijuana plants is ScrOG, or Screen of Green. ScrOG is perfect for an indoor grower who is only growing a small number of plants. In places like Colorado, for example, this method is ideal as the legal growing limit is three flowering plants at a time.
ScrOG is designed to optimize the energy from a light by creating an even canopy space where bottom growth of the plant is forced upward to form a flat canopy. By spreading out the canopy and growing the plant horizontally until a few weeks into the flowering stage, more main cola budding sites will take place. The canopy of one plant can be grown as large as a four-foot canopy.
Steps to ScrOG:
- Top the plant (See Removing Parts of Plants section below) when the plant is approximately 10 inches tall in the vegetative stage
- Top again at the second set of new node growth after your first top. At this stage, for soil or soil-less, a five-gallon pot will work
- Repeat for each new growth. If you are growing your plant larger, you must switch to at least a seven-gallon pot for soil or soilless
- Place a screen just above the topped height
- Once the growth of the new tops are long enough to move to the next square, gently bend them down under the ScrOG trellis to the next square, tucking them under to the next square
- Continue this process as the plant continues to grow - tucking the tops horizontally under each ScrOG trellis square to achieve your preferred size of the canopy for your grow space
- About a week and a half into the flowering stage, stop forcing the plant horizontally
Super Cropping
Another bending and securing method is super cropping. This is more of a high stress training, or HST, method. It can be used for any growing medium, but is best to be done a week or two before starting the flowering stage. It involves slightly hurting the plant in a premeditated manner by bending the stem until the inside tissues break, being careful to not damage the outer skin of the stem. SuperCropping can help increase yields and possibly create more potent buds.
Cannabis plants are very resilient and can pop right back up if super cropping isn’t done properly. Because of this, it is a favorable choice to tie down the branch after you have super cropped (a technique known as low-stress training).
Steps to super cropping:
- Grab the stem with your thumb and index finger and squeeze it, slightly wiggling the stem between your fingers - kind of like you’re rolling it between your fingers. This will weaken the inner tissue to assist in making your bend
- Continue the above step until the inside of the stem feels soft and pliable
- Gently bend the stem over in the direction that you want it to be in. When you bend it over, it should be sitting at approximately a 90-degree angle
Low-Stress Training
LST, or low-stress training, is less harsh than SuperCropping, as you don’t physically damage the plant. Gently bending and tying your plants’ stems to change the shape of the overall plant structure will allow bigger yields and will help your plants produce multiple colas instead of just one. We’d recommend avoiding LST during the later stages of the plant’s life, as it can become more difficult due to the plant’s thicker, woodier stems.
The LST process should be started in the early vegetative phase and can continue into week two of flowering. Keep an even canopy of growth to ensure your plants are getting proper lighting at all times.
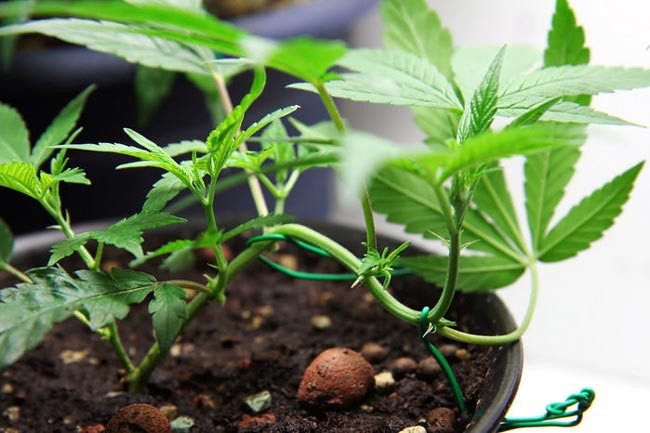
Photo Credit
With LST, the main goal is to bend taller stems down and away from the middle of the plant so that the plant starts taking a flat and wide shape. Eventually, your plant will begin to utilize its light source more effectively. LST can also be used to remedy cannabis plants that are growing taller than other ones in your grow by helping you maintain complete control over the height, shape and size of the plants.
Removing Parts of Plants
Removing parts of a cannabis plant can also help maximize yields when growing. Some of the most common techniques include topping, FIMing, and lollipopping (pruning).
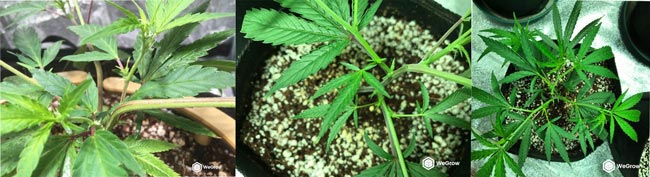
Topping
Topping is the process of completely removing the plant's main stem as a seedling by cutting off the newest node on your plant’s main cola, breaking its apical dominance, or tendency to grow one main cola, and immediately splitting the plant into two main stems. This causes the plant to transfer its energy to two new main colas, growing those while stimulating the rest of the plant to grow more wide and bushy.
By simply pruning the tops of your cannabis plant, you can grow a bushier plant with more buds. Topping will reduce the height instantly as well, which could be beneficial if you’ve let your plant get too tall while increasing the number of colas. If done correctly, effective topping will improve your final yield, meaning more bud for you at harvest.
It is best to start topping your plant when it is very young and only has a total of three to five nodes.
How to top your plant:
- Cut off the newest node on your marijuana plant’s main cola, directly above the leaves of the second node. Cut through the stem, right above its second set of leaves from the top
- Use your thumb and index fingernails to squeeze and pluck away the new growth above, down to the first set of nodes. There should not be any more than a half inch of new growth to pinch off
Often, lower branches rise to become new main colas; this is especially true if you combine topping with LST to open the plant and allow the lower branches to receive more light.
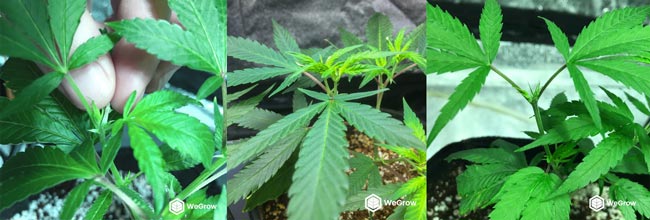
FIMing
FIMing is very similar to topping, but you’re taking about 20 percent less off the plant. FIMing is less stressful to your plant than topping, as it takes vegetative plants longer to recover from topping. FIMing also removes less of the plant’s stem than topping. By shaving the top of your plant instead of removing it completely, it can have comparable effects as topping with a reduced chance of stressing the plant and a quicker recovery time. FIMing also stimulates the plant to grow up to four main nodes in one pinch (rather than two with topping), while hardly slowing down growth or reducing the height of the plant.
FIMing is an easy way for growers to increase their yields.
Begin pinching or cutting your plant when it has three to five nodes in total. From there, use discretion based on the plants health and desired shape to determine when to FIM again. Remember, never FIM during the flowering stage!
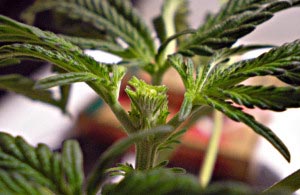
Photo Credit
To FIM, follow these steps:
- When pinching, pinch a small amount on the tips of the leaves of the newest growth on the main cola that hasn’t elongated yet
- The new leaves should look “crushed,” and your plant may look odd, but this is normal
- You will know your plant is doing well when the stems begin to thicken at the base.
We recommend FIMing and pinching over cutting your plant because it allows more room for error, is less stressful on the plant and leaves the damaged foliage on the plant. There are a couple cons to FIMing, however, such as failing to break apical dominance or the creation of asymmetrical colas.
Lollipopping/Pruning
Lollipopping is a useful pruning technique. Pruning is the process of selectively trimming plants so that they produce the most flowers or buds. For marijuana growing, this means ensuring even the smallest amount of plants obtain the maximum yield. Pruning techniques are often used by professional growers seeking to maximize results in a limited indoor growing space.

With pruning, there is no reason to keep small branches that will produce tiny buds. Pruning helps the plant focus its energy into the more developed branches and main colas, as well as keeping air flowing through all portions of the plant. Pruning should be done during the vegetation period of the plant’s life cycle.
It is suggested that you prune during the last week of vegetation before beginning the flowering stage.
While pruning has beneficial effects when growing marijuana plants, it can also cause dangerous levels of stress. Similar to humans, plants respond to stress with a hormonal release. In the case of cannabis plants, the response includes the release of jasmonic acid, a growth inhibitor. When jasmonic acid is released, plants stop growing and focus on healing. This is the reason why over-pruning can lead to stunted growth and should be conducted with great care.
Cloning
Work smarter, not harder! If you’re beginning to decide whether you want to start from seeds or clones and you want results quickly, clones are the way to go!
The Benefits of Cloning
Clones are essentially the exact duplicate of a plant with the same genetics and have a faster growing process compared to seeds. Although clones can provide a quicker route to harvest, be careful that you are taking clones from mother plants in good health. Growing a clone from a diseased mother will be problematic at best, as you will inherit the same health issues the mother is experiencing. As a beginner grower, dealing with plant health issues can be tough, so always grow with quality clones with good health and vigor.
If you keep a mother plant, you can keep growing cannabis with the same genetics and cannabinoid profiles if you take advantage of its clones. A mother plant is a plant that you keep in the vegetative growing cycle. You will also have all female plants (only female plants produce buds) when cloning from a female mother cannabis plant.
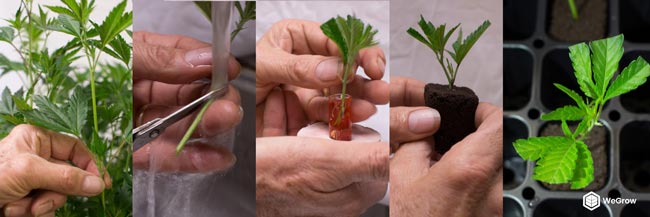
How to Take a Clone Cutting
The process is simple. A clone is simply a stem, or cutting, from a mature (and healthy) cannabis plant that has been in the vegetative phase for at least two months. When cutting a clone, it is best to take the cut at a four to five inch height so you can start topping your plants when they are shorter.
It’s also important to apply a growth hormone to the bottom portion of the cutting to promote root growth.
Once you have taken your cut and dipped into a growth hormone, take your cutting and place it in a medium, typically rockwool or rapid rooters. Then, place your cutting inside a dome that allows for high humidity levels and temperatures that do not fluctuate much outside of 75-80°F. This process can take anywhere from five to fourteen days.

Part 3 – Tips & Tricks for a More Fruitful Cannabis Grow
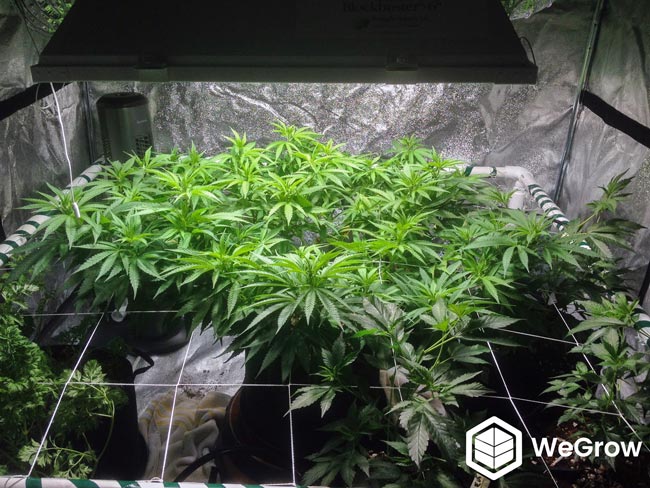
Sea of Green (SOG)
Using a technique like Sea of Green (SoG) (not to be confused with ScrOG), you can easily manipulate timelines to get faster yields with your cannabis plants. SoG is a strategy of naturally growing many little cannabis plants and putting them into the flowering stage when they are still small, resulting in a “sea” of plants. They will harvest quicker because they don’t have to be as big to support the same total number of bud sites.
Ultimately, it is up to the grower to decide how big you would like your plants to be before you initiate the flowering stage.
Considering that SoG requires no training, this technique is popular with those growing auto-flowering strains since these strains are tough to exemplify most of the traditional plant-training methods. Auto-flowering strains automatically switch from vegetative growth to the flowering stage with age, rather than differentiating vegetative and flowering environments.
If you are living somewhere with legal plant limits, SoG is more difficult because you are growing many small plants instead of training fewer big plants to fit your space. If you can grow as many plants as you want, it is a faster harvesting choice, and you can grow different strains at once.
How to Create a Sea of Green
To make your own sea of green, start by growing seeds or clone cuttings using 18 to 24 hours of light until they reach around one to 12 inches in height. Space the plants out about one or two plants per square foot. Change the lighting to 12 hours on and 12 hours off when they are about four to six weeks old to force flowering.
Many growers top their seedlings when they have four to six pairs of leaves and give them an extra few days to a week in the vegetative stage.
Once complete, all that’s left is to harvest your plants when they are ready!
Using Enzymes to Maximize Fertilizer
Another tip to speed up your harvest is to use enzymes to maximize fertilizer for your cannabis plants. Mycorrhiza, literally meaning “fungus root,” is a cannabis treasure! It helps your cannabis plant with nutrient and water absorption by increasing the surface-absorbing area of the roots and releasing enzymes which help dissolve nutrients that are more difficult for the plant to capture. These nutrients include nitrogen, phosphorus, iron and other tightly bound nutrients.
Azos and Mykos are also a great pair of bacteria for your cannabis plant.
Azos is a beneficial bacteria used in the rooting stage of clones. It promotes growth while boosting natural root development by converting nitrogen into a usable form for the cannabis plant. You simply mix it into water after the water has been adjusted to a pH level of 5.8. It is recommended to soak grow cubes in this azos mixture for best results.
Mykos is sprinkled on the roots and grow medium and is typically used during transplanting. Mykos is a natural species of soil fungi that helps a plant develop stronger roots, promoting better uptake of nutrients and water.
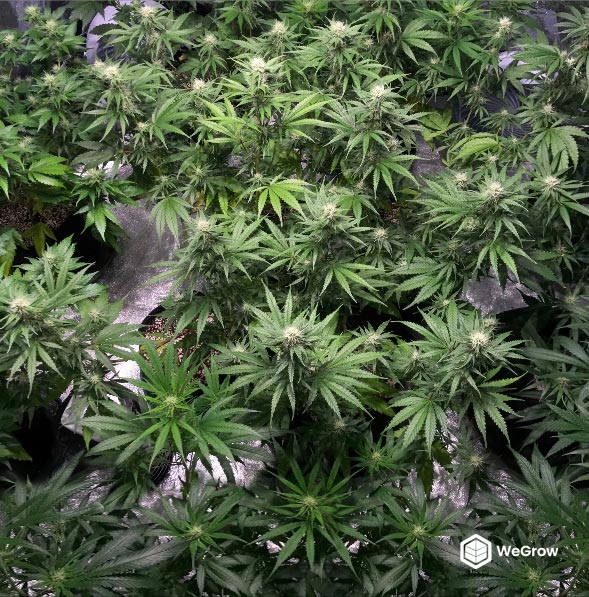
Harvesting, Drying and Curing
Finally, it’s harvest time! To start drying your cannabis plant, the temperature should be set to 70°F and the humidity to 50% with absolutely no light!
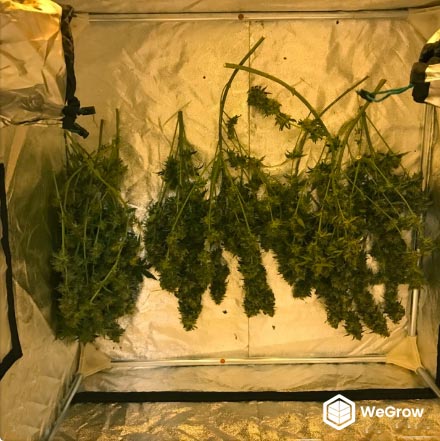
The hanging method is the most popular when it comes to drying cannabis. Cut your branches into one to two foot sticks and use a thin wire to tie them in a long strand from the ceiling of a grow tent. Keep them about one foot off the ground. Continue using a fan to circulate air, but be careful to not point the fan directly on the drying buds.
If you are using a dehumidifier, also be careful not to hang the drying buds above the exhaust of the dehumidifier.
Once the stems of the individual buds start to snap when you bend them, the drying process is complete.
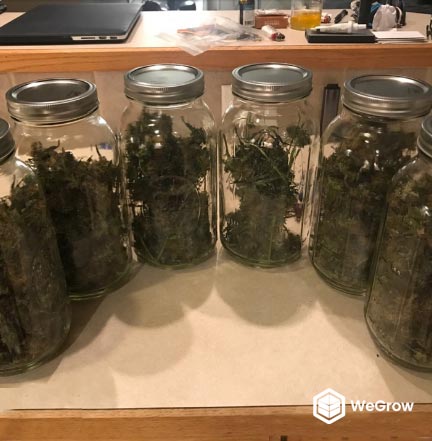
Once drying is complete, it’s time to cure your buds. We recommend using glass jars and to fill them about ¾ full of bud. Keep the jars stored in a cool, dark place around 70°F to properly cure your buds. This process takes about four weeks and should not be rushed.
It is important to burp the jars, or let some air in, periodically so mold doesn’t start growing.
For the first week, burp the jars for one hour each day. For the second week of curing, burp the jars for 30 minutes each day. For week three, burp for fifteen minutes a day for the first half of the week and add humidity packs, such as Boveda, during the second half of the week. In week four, you will not need to burp, and it will be about time to enjoy some fresh, tasty, homegrown buds!
Thanks for growing cannabis with us! We hope you found this grow guide to be a useful tool on your journey to becoming a better grower.
Happy Growing, See you next time!